
This tutorial is the best guide you’ll find on WP Rocket’s settings (even though FlyingPress is better) and seat back while Naijatechnews sail you throughout the setup.
My goal was to go beyond regurgitating their documentation and talk about things like Cloudflare APO, lazy loading background images, and even lacking features in WP Rocket. I’ll show you why BunnyCDN is miles ahead of RocketCDN and how Perfmatters optimizes several things not found in WP Rocket (including why “removing unused CSS” is faster in Perfmatters).
These settings are meant to give you the best core web vitals scores as well as real-world browsing speed (something WP Rocket needs to work on). With that said, I switched to FlyingPress for all the reasons I just listed.
But I’ll assume you’re sticking with WP Rocket and help you get the most out of it. I’ve used it for many years and have updated this tutorial with “the new settings” more times than I can count. I try to keep it updated as best I can (feel free to comment if you see anything). Enjoy otherwise!
How to setup Wp Rocket 🚀 from A-Z
1. Dashboard
General information about your subscription to WP Rocket and RocketCDN. I never let plugins collect data since it results in a (very small) performance decrease. You can clear cache if you make design changes and aren’t seeing them. Otherwise, there’s nothing to do here. I let my subscription expire after moving to FlyingPress but will renew soon to keep this guide updated.

2. Cache
There are a handful of situations where WP Rocket’s page caching should be disabled using the helper plugin:
- When your host already handles page caching.
- When you’re using Super Page Cache for Cloudflare.
- When you’re using another cache plugin for page caching.
Brian Li from Kinsta explains why WP Rocket’s page caching should be left on when using APO. It’s a different layercompared to page caching on the origin server, object cache, etc. Which means in most cases, you should keep WP Rocket’s caching On. I don’t suggest using 2 cache plugins but some people like to use SG Optimizer for caching and WP Rocket for WordPress optimizations, so you would disable WP Rocket’s page cache. When in doubt, contact your host.
WP Rocket has specific instructions and helper plugins when using NGINX + Varnish, such as using the NGINX helper plugin when NGINX caching is enabled and using custom Varnish IPs.

Mobile Cache: On – enables caching for phones (tables are treated the same as desktop but can be changed with a helper plugin). The only reason mobile cache should be off is if your website isn’t responsive. Check the documentation if you’re seeing the wrong display on certain devices.
Separate Cache Files For Mobile Devices: Off – only enable if you have mobile-specific elements and need WP Rocket to show them using a separate mobile cache, or in situations like if you’re using the Avada theme / WP Touch. Otherwise, you should keep this setting turned off.
User Cache: Off – only enable if you have logged-in users (i.e. bbPress) where there’s user-specific content. In this case, WP Rocket gives each user their own cached version. If you turn this on and have custom login and logout pages, make sure those are excluded from the cache. If this is turned on, there are several helper plugins to get user cache working properly like force page caching, disable page caching for logged-in users, and common cache for logged-in users.
Cache Lifespan: 24 hours – a lower number means the cache refreshes frequently but increases CPU usage (good if you publish content frequently and need your site updated). A higher number means the cache won’t refresh as frequently which can decrease CPU usage (good if you don’t publish content often and want to save server resources). If you’re getting CPU issues, you can also use WP Rocket’s helper plugin to disable automatic cache clearing.
3. File Optimization
WP Rocket’s file optimization settings arguably have the biggest impact on speed and web vitals, but they can also be different for each website. For most sites, minify CSS/JS should be ON but combine CSS/JS should OFF. Remove unused CSS should ideally be done by Perfmatters (not WP Rocket). Defer/delay JavaScript should both be ON and can improve multiple PSI items.

Minify CSS/JS Files: On – removes whitespace from code. When using APO, Cloudflare recommends using WP Rocket for minification then leaving minify settings OFF in Cloudflare.
Combine CSS/JS Files: Off – this setting doesn’t work when “delay JavaScript execution” is on. WP Johnny also explains why you shouldn’t combine especially on websites with large CSS/JS files (which you can check in your GTmetrix Waterfall chart). Combining CSS/JS files can also cause issues when using HTTP/2 and HTTP/3 servers. For all these reasons, leave this setting off.
Excluded CSS/JS Files: if enabling a minify setting breaks your website, view your source code, find the problematic file, and add it here. See WP Rocket’s post on resolving minification issues.
Optimize CSS Delivery: Off (Use Perfmatters To Remove Unused CSS Instead) – a big issue with WP Rocket’s remove unused CSS feature is that even after they revamped it in 3.11, it still loads used CSS inline. While this is better for scores, it’s slower for visitors since the file can’t be cached and increases HTML size. Even the Perfmatters documentation says inline is better for PageSpeed scores while “separate file” is better for perceived performance. FlyingPress (and now Perfmatters after they released an update) load used CSS in an external file which is faster.

If you’re not using Perfmatters, you can use WP Rocket to remove unused CSS instead.
If removing unused CSS breaks your site, you’ll want to load CSS asynchronously(although it won’t give you as good of results). Once enabled, run your site through a critical CSS generator, copy the code, and paste it into the fallback critical CSS. If you’re still getting issues and it’s breaking your site, you can use the helper plugin to exclude problematic files from CSS delivery.


Large CSS/JS files are usually caused by themes/plugins which you can check in your Chrome Dev Tools coverage tab. Rather than relying on a plugin to do the work for you, you’ll have even better results if you fix it at the source (in other words, use Gutenberg and lightweight plugins).

Load JavaScript Deferred: On – loads JavaScript after the page has finished parsing and eliminates render-blocking resources in PSI. If you still see render-blocking issues, you can try installing Async JavaScript on top of WP Rocket then toggling on “apply defer” in the settings.

Delay JavaScript Execution: On – delays loading JavaScript until user interaction (such as scrolling or touching the screen on mobile). If this breaks your website, view WP Rocket’s compatibility exclusions and exclude any plugins/themes/services from being delayed using their documentation. Also make sure your data/revenue isn’t impacted when using AdSense.
This can significantly improve multiple areas of core web vitals. You could also use the Flying Scripts plugin which lets you add JavaScript manually and delay it using a timeout period, but WP Rocket works well. And remember, enabling this will disable and gray out combine settings.
4. Media
WP Rocket lacks several image optimizations, so I’ll cover the Media settings and workarounds for lacking features (including lazy loading background images + preloading your LCP element).

Lazy Load for images: On – delays loading of images until users scroll down the page and they become visible in the viewport. When it’s on, WP Rocket automatically disables native lazy load.
Even when lazy load is on in WP Rocket, it won’t lazy load background images in Elementor, separate CSS files, when using ShortPixel’s Global WebP rewrite, and in other situations. This can lead to errors in PageSpeed Insights for defer offscreen images. So, you have a few options:
- Move background images to inline HTMLso WP Rocket can lazy load them.
- Disable lazy load in WP Rocket and use Optimole which lazy loads background images using CSS selectors (you’ll use Chrome Dev Tools to find selectors for background images).
- Use a lazy-bg class. This is built-in to FlyingPress or you can try adding the code manually. This makes it much easier since you can simply assign lazy-bg as the additional CSS class.

WP Rocket lazy loads background images when applied inline in HTML using one these:
- div
- span
- section
- li
- figure
- a
divs are probably the easiest and shown in their documentation, so we’ll stick with that. All you have to do is follow the same markup used in WP Rocket’s documentation, which looks like this:
<div style="background-image: url(image.jpg)">If you use SVGs, image dimensions should be visible on the frontend:
<img style="height: 100%; width: 100%; object-fit: contain" src="https:/example.com/wp-content/uploads/background-image.svg" alt="Some alt text">Enable for iframes and videos: On – similar to lazy loading images but for iframes/videos.
Replace YouTube iframe with preview image: On – replaces the “fat YouTube player” with a preview image so it’s only loaded when people click it. It can significantly improve load times when embedding videos. However, you may see external requests from ytimg.com which are from the thumbnails. FlyingPress is the only plugin I know that self-hosts YouTube placeholders.
Exclude images or iframes – it’s counterintuitive to lazy load above the fold images/iframes since visitors see them immediately (it also increases LCP). Copy the URLs of above the fold images and exclude them here. Common examples are logos, background, and sidebar images.
You should also preload above the fold images, but WP Rocket doesn’t have a setting for it. PSI shows your LCP element which is often an image/background image. You can use Perfmatters to preload critical images, use Pre* Party Resource Hints, or add the code manually to your header.

<link rel="preload" href="https://onlinemediamasters.com/wp-content/uploads/2022/03/background-image.webp" as="image"> Add Missing Image Dimensions: On – adds missing width/height attributes to HTML images. This fixes layout shifts as well as use explicit width and height on image elementsin PSI. When viewing your image’s HTML, it should now have a width and height with specified dimensions:
<img src="example.png" width="680" height="680" />WP Rocket does not compress images, serve them in next-gen formats (WebP), or serve smaller images to mobile devices. Read the image optimization section for alternatives.
5. Preload
Learn how to reduce CPU usage by preloading only important sitemap URLs and changing the crawl interval, how to preload fonts, and why you (usually) don’t need to prefetch any domains.

Activate Preloading: On – tells browsers to start fetching resources needed soon. If you’re getting high CPU usage, install the custom preload intervals helper plugin and change the crawl interval from the default 500ms to something like 1000ms. You could even set up a cron job so WP Rocket starts preloading at a specific time (i.e. in the middle of the night / low traffic hours).
Activate Sitemap-based cache preloading: On – preloading the full sitemap can increase CPU usage. The best thing to do is check your sitemap (i.e. https://example.com/sitemap_index.xml) and only add the most important ones. In most cases, this is only your page and post sitemaps.

Preload Links: On – when users hover over a link for more than 100ms (or touches the link on mobile), the page will download in the background so when users click it, it appears to load instantly. This won’t improve scores but helps with perceived load time. The problem is if you have a site where users hover over lots of links (i.e. product images), it can cause CPU spikes.
Prefetch DNS Requests – check the sources tab of Chrome Dev Tools to see all third-party hostnames loading on your website. Most of these are already delayed (via delay JavaScript execution), so there’s no reason to prefetch them. WP Rocket automatically preconnects CDN CNAMEs + fonts.gstatic.com, so there’s no reason to prefetch these either. The only third-party domains you should prefetch are the ones not delayed or preconnected by WP Rocket. In most cases, this is only a couple domains or even 0. While preloading/preconnecting too many URLs can negatively impact on speed, prefetch is more forgiving if you add domains not being used.

Preload Fonts – you don’t need to do anything here if remove unused CSS is on since WP Rocket will preload fonts automatically. If it’s not on, you will need to preload fonts manually.
Only self-hosted fonts can be preloaded (fonts served from your website or CDN, not fonts.gstatic.com). In Elementor, you can host fonts locally under Theme Customizer → Performance. Or you could also use the OMGF plugin or even manually host fonts locally.
Once fonts are hosted locally, open your GTmetrix Waterfall chart and view all your font files. Find any fonts loading above the fold or mentioned in your CSS file, copy their URLs, and paste them in WP Rocket to preload them. Retest your website in GTmetrix and you should notice the font’s blocking time is faster. Avoid preloading too many fonts which can have a negative effect. PSI used to tell you which fonts to preload in preload key requests, but I don’t think it does now.

6. Advanced Rules
There are only a handful of situations where you need to use WP Rocket’s advanced rules, but the high majority of websites can leave these as-is. WP Rocket is already compatible with most eCommerces sites (i.e. WooCommerce) and excludes the cart, checkout, and my account pages.

Never Cache URLs – if you’re using an eCommerce shopping cart that is not supported by WP Rocket, add your cart and checkout pages here which will exclude these pages from the cache.
Never Cache Cookies – same principle as previous option only based on cookies.
Never Cache User Agents – prevent Googlebot or other user agents from caching pages.
Always Purge URLs – let’s say you have a blogroll on your homepage. If you create a new post, you want that homepage blogroll updated immediately by emptying the homepage cache. That’s what this setting does, however WP Rocket automatically clears the cache for your homepage, categories and tags once new content is created… so there is usually no need for this. But if there are other page’s cache you want cleared when new content is posted, add it.
Cache Query Strings – query strings are URLs that look like this: ?country=italy. These URLs aren’t cached by default but if you want to cache them, add “country” in the field (for example).
7. Database
You should usually delete everything but post revisions + autosaves, then use WP-Optimize to do a deep cleaning of your database.

- Revisions: Off – every time you hit the “Publish” button, a post revision is stored. Instead of deleting all them which leaves you with no backups, they should be limited to maybe 3-10. You can do this by adding the code below to your wp-config file, or using WP-Optimize.
define('WP_POST_REVISIONS', 5);- Auto Drafts: Off – if you exit out of your browser accidently, WordPress will store auto drafts so you don’t lose your work. If you’re sure you don’t have any, you can delete them.
- Trashed Posts: On – posts/drafts you deleted.
- Spam Comments: On – comments marked as spam.
- Trashed Comments: On – comments marked as trash.
- Expired Transients: On – transients that expired and are still in your database.
- All Transients: On – stores data that takes a long time to retrieve (i.e. blog social counts).
- Optimize Tables: On – optimizes database tables but doesn’t work on the InnoDB engine.
- Automatic Cleanup: Weekly – although you should take backups beforehand just in case.
WP-Optimize – WP Rocket doesn’t let you go through your actual database tables while WP-Optimize does. This is not only helpful for removing tables left behind by old plugins (which you already deleted) but it can also show which plugins/modules add the most database overhead. For example, I decided to disable a few Rank Math modules since they added lots of overhead. This is common with SEO plugins, security plugins, and other plugins that collect/process data.


8. CDN
This section is for CDNs that use CDN URLs (BunnyCDN, RocketCDN, KeyCDN, etc). Cloudflare is set up in this section, although I suggest using both Cloudflare/BunnyCDN.
Here’s BunnyCDN is better than RocketCDN (StackPath):
- It’s faster (80 Tbps instead of StackPath’s 65 Tbps).
- BunnyCDN has 94 PoPs while StackPath only has 60.
- It has better performance and reliability on cdnperf.com.
- It has geo-replication which I definitely recommend (paid add-on).
- It has Bunny Optimizer for optimizing images at the CDN level (paid add-on).
- StackPath was removed from cdnperf.com and has had major issues in the past.
- RocketCDN is only a CDN that serves files from StackPath. There’s no other features.
- BunnyCDN is $0.01/GB – $0.06/GB depending on regions you use, which is very cheap.
- RocketCDN advertises $7.99/mo for unlimited bandwidth which is misleading advertising.

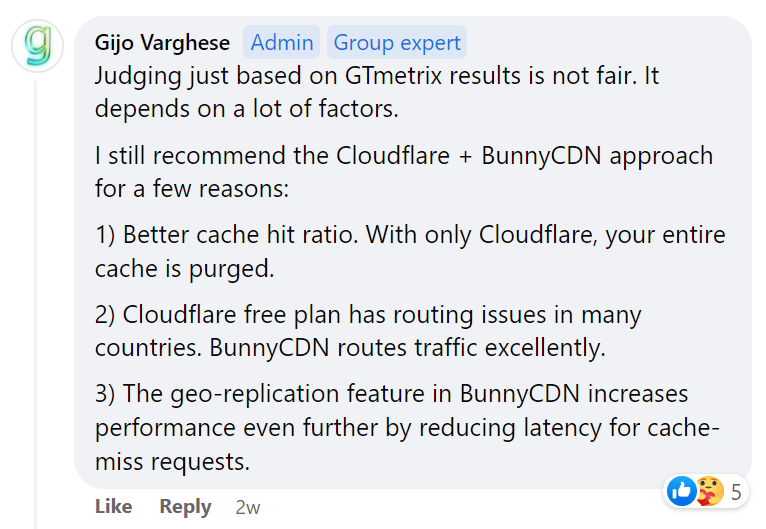
I use Cloudflare + BunnyCDN which is also recommended by Gijo from WP Speed Matters (same guy from FlyingPress). I use Cloudflare Entrprise on Rocket.net or you can get this through Cloudways or Kinsta (but there’s no full page caching and annoying challenege pages).
Here are some polls and threads.
Step 1: Sign up for BunnyCDN and add code OMM5 to the billing section for $5 in free credits.

Step 2: Create a pull zone, add your website name, and choose your regions.

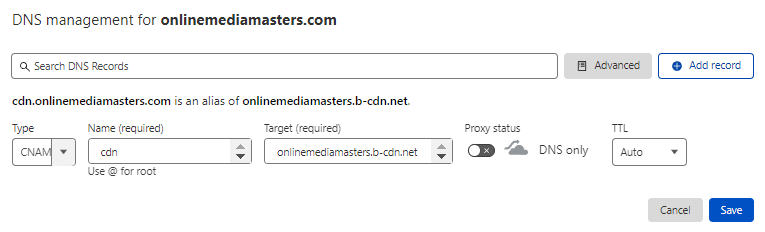
Step 3: Copy your CDN URL or set up a custom hostname like cdn.exmaple.com (optional).

Step 4: Paste the CDN URL in WP Rocket’s CDN CNAME(s) field.

Step 5: Install the BunnyCDN plugin and add your pull zone name. Doing this and adding your CDN URL to WP Rocket can serve more assets and was recommended by BunnyCDN’s support.

Step 6: Purge cache and view your source code to make sure files are served from the CDN.

Step 7: Change any URLs in your WP Rocket settings to match your new CDN URL from BunnyCDN (excluded images, preload fonts, etc). For example, an excluded image would look something like: https://cdn.onlinemediamasters.com/wp-content/uploads/2022/05/logo.png
Step 8: Consider BunnyCDN’s geo-replication which automatically copies your files to their storage zones so files are pulled from the closest zone. It’s found in Caching → Perma-Cache.
Once you enable perma-cache, go to Storage → Add Storage Zone. Give your storage zone a name (your business name is fine), select your main storage region, then click “Enable Geo-Replication.” You’ll be prompted to select the regions where you want your files to be replicated. The price is $0.010/GB for the first 2 regions (including your main storage region) then $0.005/GB for each additional region. You can just select regions where you have lots of visitors.
When you’re done, click “Add Storage Zone.”

Now if you click your storage name (ommstorage), you’ll get a new set of menus where you can use the file manager to upload/access files from your edge storage zone, error handling settings, and the replication tab where you can add more storage zones in case you ever want to expand.

The last (optional) step would be to set up Bunny Optimizer for image optimization. Otherwise, you’re done!
Exclude Files From CDN – lets you serve files locally instead of the CDN. Usually, these files come from plugins designed to disregard cross domain load. In most cases, there is no need.
Example:
- {uploads_dir}/wpcf7_captcha/*
- {uploads_dir}/imagerotator.swf
- {plugins_dir}/wp-fb-autoconnect/facebook-platform/channel.html
9. Heartbeat
Heartbeat shows you when other users are editing a page/post, real-time plugin notifications, etc. Disabling/limiting it in certain areas can decrease CPU usage since it runs every 15-60s by default. I recommend disabling Heartbeat in the backend and frontend, then reducing activity (to 120s) in the post editor since you want to keep things like autosaves and similar functions.

- Backend: Disable
- Post Editor: Limit
- Frontend: Disable
10. Add-Ons
Just enable add-ons you use.

Varnish – only turn on if your host uses Varnish. This is turned on automatically for some hosts using Varnish (Cloudways, Flywheel, WP Engine) and off if using SiteGround, Kinsta, Pressable.
WebP Compatibility – disable in most cases. Even if you use WebP, it should be disabled when using a CDN, .htaccess rules, or <picture> elements to serve WebP images (also disable when using Optimole, ShortPixel Adaptive Images, or WebP Express). WP Rocket doesn’t create WebP images (I use BunnyCDN) so it’s just for compatibility reasons. If you notice images aren’t being served in WebP, try their helper plugin to force images which are using unsupported attributes.
Cloudflare – enable when using Cloudflare but leave off when using APO. The modify options have more settings to add your global API key, Cloudflare email, and Zone ID (for compatibility). No, that’s not my real Cloudflare API key shown in the screenshot – but thanks for looking out 🙂
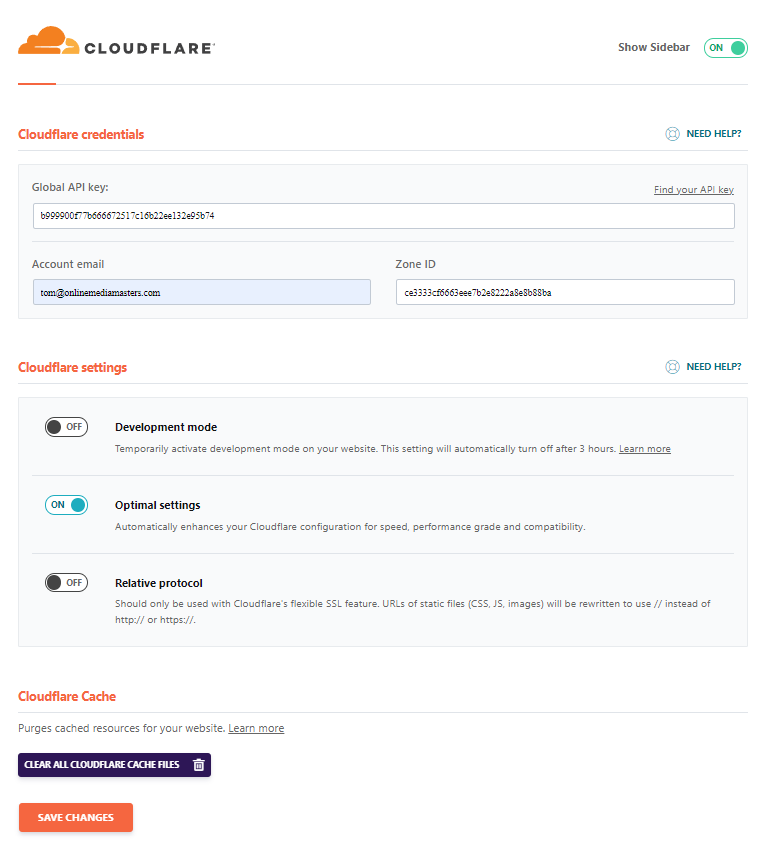
- Global API Key – found in your Cloudflare dashboard here.
- Account Email – same email used in your Cloudflare account.
- Zone ID – found in the Overview tab of your Cloudflare dashboard.
- Development Mode: Off – only use when making lots of code changes to your site.
- Optimal Settings: On – activates WP Rocket’s recommended Cloudflare settings which include the following changes: set the caching level to standard, enable auto minify for JavaScript, CSS and HTML, disable Rocket Loader, set browser cache expiration to 1 year.
- Relative Protocol: Off – only used for flexible SSL, but full SSL is preferred.
- Clear All Cloudflare Cache Files – Cloudflare’s cache should be purged automatically when WP Rocket’s is, but if you need to do it manually for some reason, you can do it here.
Sucuri – only enable if you’re using Sucuri’s firewall which clears Sucuri’s cache when WP Rocket’s cache is cleared. Modifying options prompts you to enter your Sucuri Firewall API Key.
11. Cloudflare
Before diving into Cloudflare, let’s talk about APO, Enterprise, and the dashboard.
Cloudflare APO – while there’s no official APO integration with WP Rocket and they say it’s not compatible, you can still use APO by setting it up using the Cloudflare plugin, then disabling the Cloudflare add-on in WP Rocket. Some people use the cache everything page rule or Super Page Cache for Cloudflare, but they’re not the same and cache everything can have admin bar issues. Is APO worth $5/mo? I would test your site in KeyCDN’s Performance Test and do a benchmark before/after APO. It caches HTML and you should see a TTFB improvement in several locations.
Cloudflare Enterprise – Rocket.net is best with full page caching, no constant challenge pages, better WAF rules, it’s free, and they built their data centers in the same locations as Cloudflare’s. You get features like prioritized routing, more PoPs, WAF, DDoS protection, Mirage + Polish, Argo + Tiered Cache, and global load balancing. You can see differences between Cloudflare free vs. paid plans, just know that your host controls everything and you’re relying on them (as oppose to configuring things yourself in the CF dashboard). Depending on the host, that’s a good thing.
Cloudflare Dashboard Settings – if you set up Cloudflare Enterprise with Cloudways or Rocket.net, there’s no reason to configure anything in the Cloudflare dashboard since it’s integrated with your hosting. Obviously not everyone uses Enterprise, in which case you’ll want to go through your Cloudflare settings and take advantage of free (and possibly paid) features.
Step 1: Sign up for Cloudflare. Some hosts let you add Cloudflare directly in your hosting account, but the settings are limited. The only exception I would do this is if you’re using Enterprise. Otherwise, add your website to Cloudflare and they’ll assign you 2 nameservers.

Step 2: Change nameservers in your domain registrar to Cloudflare’s.

Step 3: In Cloudflare’s DNS settings, change your website from DNS Only to Proxied. This activates their CDN by proxying traffic and is required to use APO as well as other features.

Step 4: If you’re not using APO, turn on the Cloudflare add-on in WP Rocket, click “modify options,” then fill out your Cloudflare information (already explained in the add-ons section).
Step 5: If you plan on using APO, follow Cloudflare’s instructions or use mine:
Setting Up Cloudflare APO With WP Rocket
- Use KeyCDN to benchmark your TTFB in 10 global locations.
- Disable the Cloudflare add-on in WP Rocket.
- Keep caching enabled in WP Rocket which is a different layer.
- Keep minification on in WP Rocket and leave it off in Cloudflare.
- Make sure traffic is proxied through Cloudflare (required for APO).
- Purchase APO in your Cloudflare dashboard.
- Install the Cloudflare plugin.
- Create an API token and add it to the Cloudflare plugin.
- Purge cache in WP Rocket, then in Cloudflare.
- Confirm APO is working using uptrends.com.
- Retest your site in KeyCDN to compare the results.

Step 6: Configure your Cloudflare dashboard.
Free Cloudflare Settings
- DNS – one of the fastest and most reliable DNS providers on dnsperf.com.
- CDN – in your DNS settings, change your website from DNS only to proxied.
- TLS 1.3 – fastest TLS protocol (I recommend setting min. TLS version to 1.2).
- Bot Fight Mode – block spam bots which are logged into your firewall events.
- Early Hints – early preload/preconnect hints which improves server wait time.
- Crawler Hints – tells crawlers if content is updated to prevent wasteful crawls.
- Page Rules – common page rules for WordPress sites.
- Firewall Rules – common firewall rules for WordPress.
- HTTP/3 With QUIC – delivers website from faster HTTP/3 (use a HTTP/3 test).
- Hotlink Protection – stops websites from copying images and using bandwidth.
- Zaraz – offloads third-party scripts to Cloudflare (Google Analytics, Ads, others).
- SXGs – prefetches content so it loads faster when your site is clicked in Google.
Paid Cloudflare Add-ons
- APO – caches HTML and can improve TTFB in multiple global locations.
- Argo – avoids congestion by routing traffic through fastest network paths.
- Mirage + Polish – I prefer using Cloudflare to optimize images instead of plugins.
- Load Balancing – traffic is re-routed to healthier and faster origin servers. It’s also known as geo-based routing and is similar to the BunnyCDN perma-cache feature.
- Rate Limiting – protects site + reduces bandwidth by stopping excessive requests.
Step 7: Check your Cloudflare Analytics in a few days to see how much bandwidth is being offloaded, along with other analytics. BunnyCDN may be doing some of the heavy lifting too.

12. Image Optimization
Unfortunately, WP Rocket doesn’t optimize images outside of the lazy load settings.
I recommend Cloudflare Mirage + Polish or Bunny Optimizer over image optimization plugins mainly because they optimize images on the fly instead of permanent optimization. Sure you can keep backups of images, but it’s easier to do it from your CDN even though it costs money.
WP Rocket recommends Imagify because it’s their own plugin while ShortPIxel + ShortPixel Adaptive Images are also popular. You ideally want to use it to compress images with about an 85% compression level, serve images in WebP, remove EXIF data, and serve smaller images to mobile devices. You could also optimize images before uploading them in Photoshop, Gimp, or other tools. This would also mean you’ll need a WebP plugin such as WebP Converter For Media.

13. Tools
Import or export your WP Rocket settings, or rollback to the previous version.

Export Settings – export your settings to use on multiple sites.
Import Settings – import your pre-configured WP Rocket settings.
Rollback – if you updated WP Rocket and it caused issues, fall back to the previous version.
WP Rocket Helper Plugins
WP Rocket’s helper plugins are listed on Github or you can do a Google search for them. I tried to list some of the most common helper plugins in this guide, but there are quite a few others.

High CPU Usage On WP Rocket
Some of my recommended WP Rocket settings should already help reduce CPU usage, like increasing cache lifespan and only preloading important sitemap URLs. WP Rocket’s documentation also recommends setting up a cron job to clear WP Rocket’s cache/preload during low traffic hours, decreasing the remove unused CSS processing batch, or disabling preload completely. Beyond the documentation, here are a few other tips to reduce CPU usage:
- Leave SiteGround (or other shared hosting).
- Offload as much bandwidth as you can to CDNs.
- Block bad bots using Cloudflare’s bot fight mode.
- Find slow plugins/bottlenecks using Query Monitor.
- Use hotlink protection to stop people from copying images.
- On top of Heartbeat, limit post revisions and autosave interval.
- Keep your PHP, WordPress, MySQL, and other software updated.
Disable WP Rocket Settings On Specific Pages
Just a quick reminder that if certain settings break your website but only in a few places, you can edit the page and toggle settings ON/OFF on the page instead of disabling them completely.

WP Rocket vs. FlyingPress. vs. SiteGround Optimizer
I’ll argue WP Rocket is better than SiteGround Optimizer because it has more features and a more reliable development team who does a lot of R&D. SiteGround releases updates that aren’t tested thoroughly and optimizes for cost savings much more than than core web vitals. However, I would put FlyingPress ahead of WP Rocket because ya know, just look at the table.
3 plugins I’d consider on top of WP Rocket are:
- Perfmatters
- OMGF (for hosting fonts locally, or do it manually)
- Pre* Party Resource Hints (for preloading above the fold images, or do it manually)
| SG Optimizer | WP Rocket | FlyingPress | |
|---|---|---|---|
| Server-side caching | ✓ | x | x |
| Delay JavaScript | x | ✓ | ✓ |
| Remove unused CSS | x | Inline | Separate file |
| Critical CSS | x | ✓ | ✓ |
| Host fonts locally | x | x | ✓ |
| Font-display: swap | x | ✓ | ✓ |
| Preload links | x | ✓ | ✓ |
| Preload critical images | x | x | ✓ |
| Fetchpriority resource hint | x | x | ✓ |
| Lazy render HTML elements | x | x | ✓ |
| Lazy load background images | x | Inline | Helper class |
| Exclude above the fold images | By class | By URL | By number |
| Add missing image dimensions | x | ✓ | ✓ |
| YouTube iframe preview image | x | ✓ | ✓ |
| Self-host YouTube placeholder | x | x | ✓ |
| CDN (beyond Cloudflare) | SiteGround CDN | StackPath | BunnyCDN |
| CDN PoPs | 14 | 60 | 93 |
| CDN Tbps | N/A | 65 | 80 |
| Dynamic caching | Premium | x | Vary cache |
| CDN geo-replication | x | x | ✓ |
| CDN image optimization | ✓ | x | ✓ |
| CDN image resizing for mobile | x | x | ✓ |
| Documented APO compatibility | x | x | ✓ |
My Setup
- Rocket.net with Cloudflare Enterprise + full page caching. They average a <100ms global TTFB with 32 cores + 128GB RAM, NVMe SSDs, and Redis. Top performer in Kevin Ohashi’s tests with up to 25x more monthly visits than Kinsta and don’t limit PHP workers since only about 10% of traffic hits your origin. Check their TrustPilot reviews, my review, or reach out to Ben. I can pretty much bet Rocket.net’s specs beats every host in this price range which starts at $25/mo (and $1 for first month).
- FlyingPress – just look at the table (FlyingPress is clearly better than WP Rocket).
- FlyingCDN – was using it on top of Cloudflare for a while. Powered by BunnyCDN with image optimization + geo-replication. Cheaper than buying them from Bunny.
- Perfmatters – I mainly use it for asset unloading + bloat removal since FlyingPress and Cloudflare Enterprise handle everything else. Becomes even more useful for compensating for lacking optimizations not found in WP Rocket or SG Optimizer.
- GeneratePress (Search template) – love this theme. Was also able to replace my tables, gallery, and comments plugins with native Gutenberg blocks + comments.
- GenerateBlocks – block templates for GeneratePress (pretty mandatory for me).
Still have questions? Drop me a comment and I’ll get back to you as soon as I can.
For more such interesting article like this, app/softwares, games, Gadget Reviews, comparisons, troubleshooting guides, listicles, and tips & tricks related to Windows, Android, iOS, and macOS, follow us on Google News, Facebook, Instagram, Twitter, YouTube, and Pinterest.


