
Instant Website Monetization | How To Start Making Money With Adsterra.
When we say “instant,” we mean instant. Adsterra has been known for the fastest website approval and moderation. Adsterra’s Self-Service Platform for publishers is a powerful control center where you manage your website or blog monetization.
If you’re looking for an AdSense alternative ad network, you should take a look at Adsterra, not only for the reasons of the approval speed. Our two and irreversible rules are traffic quality and traffic genuineness. We make it easy for any publisher or webmaster to grow, setting almost no limits to the number of website visitors. We also show zero tolerance to bot traffic and spam clicks which we quickly identify and ban.
If you are new to website monetization or looking for alternative or supportive ways of growing passive income, read our updated guide to getting started with Adsterra. We will outlook the whole platform and guide to setting up publishers’ dashboard step by step.
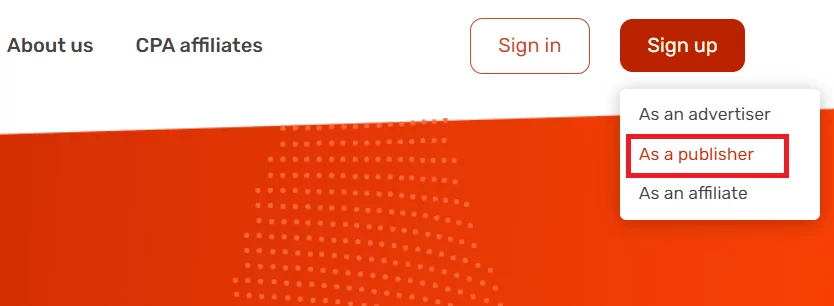
Register or sign up as a publisher
Your first step to making profits with Adsterra is registration. Please navigate to adsterra.com and choose SIGN UP → AS A PUBLISHER from the upper menu.
Registration page
After you hit SIGN UP AS A PUBLISHER, you will be redirected to the registration page. The first step is elementary. You enter your name and email, and then click CONTINUE.
Please make sure you entered a valid email as it will be attached to your account, and you will get all advertising codes in your inbox.

Complete registration
Next, you see the Complete registration page where you need to enter some more details:
- make up a login
- make up a password
- choose the most suitable way to contact you and enter its account name (you can change it later)
- choose the preferred payment method and enter the data required (for PayPal it’ll be the e-mail your wallet is attached to)
- list the websites you want to monetize.
All fields require actual data except the last one, with your websites list.
Click the COMPLETE REGISTRATION button.
After you click, you’ll see our service message where we ask you to check the email and follow the verification link. Let’s move on to this part of the guide!
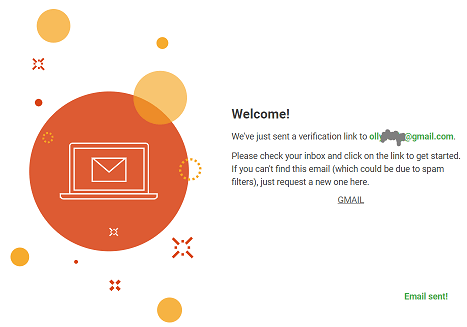
Verify your email
Now you will need to verify the email you entered earlier. Please open your inbox and find our letter (usually, it’s from Adsterra Team). Open it and click CONFIRM EMAIL.
* Check the Promotions and Spam folders if nothing found in the main inbox.
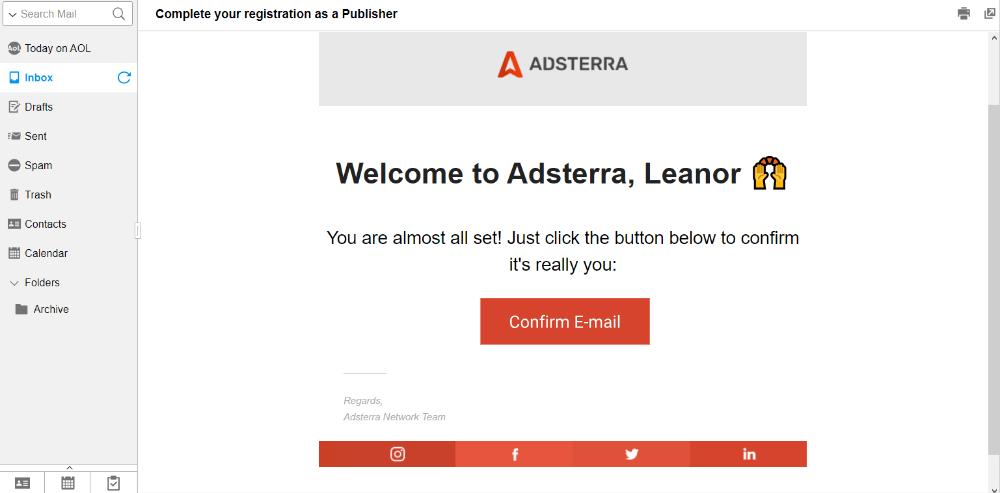
By clicking the CONFIRM EMAIL button, you navigate to the authorization page and automatically sign in to your account. Sometimes you will be asked to re-enter your login and password. Just type them in and enter your account.
Now you are going to get familiar with the main tools, functions, and website monetization opportunities of your Publisher’s account on Adsterra.
What’s inside a publisher’s account
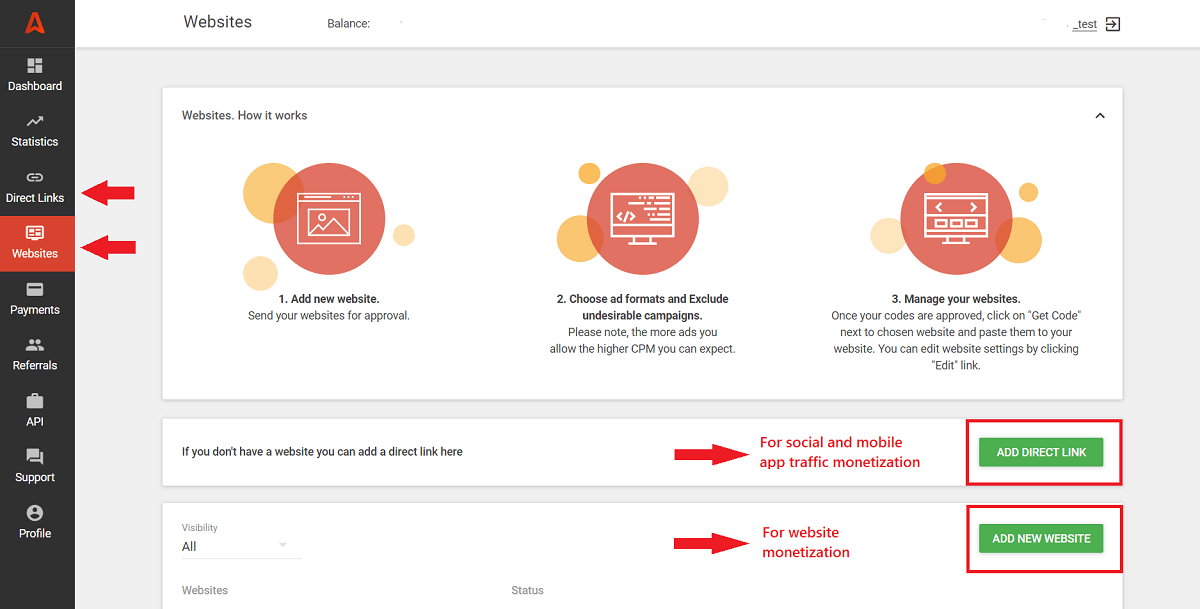
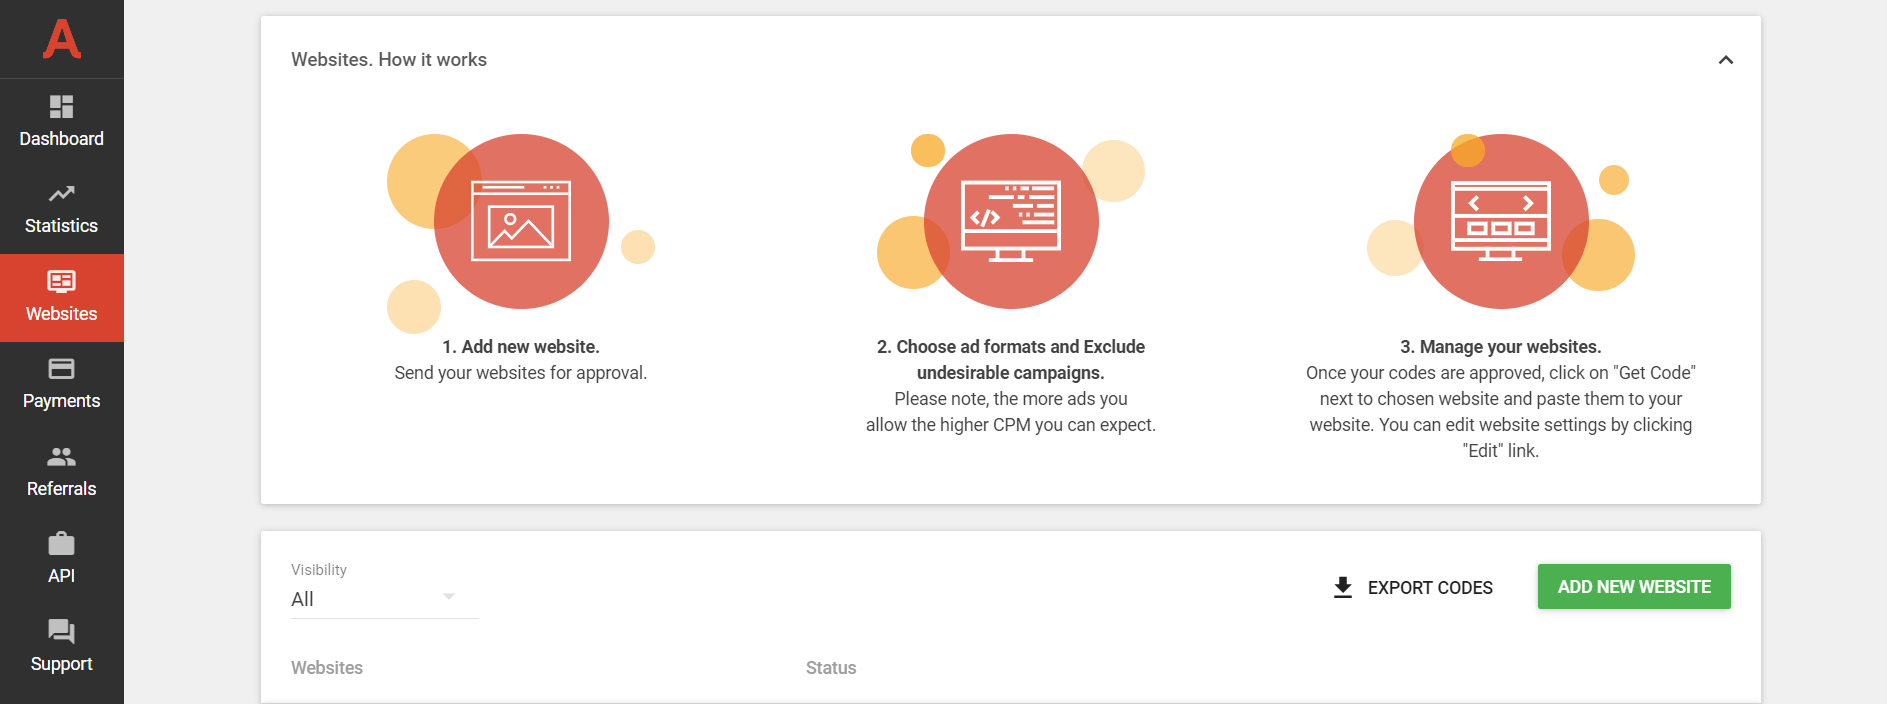
The first page you see after signing in is the Websites page. Here you will add all websites you want to earn from. You can see the big ADD NEW WEBSITE button here. We will click on it in a few seconds.
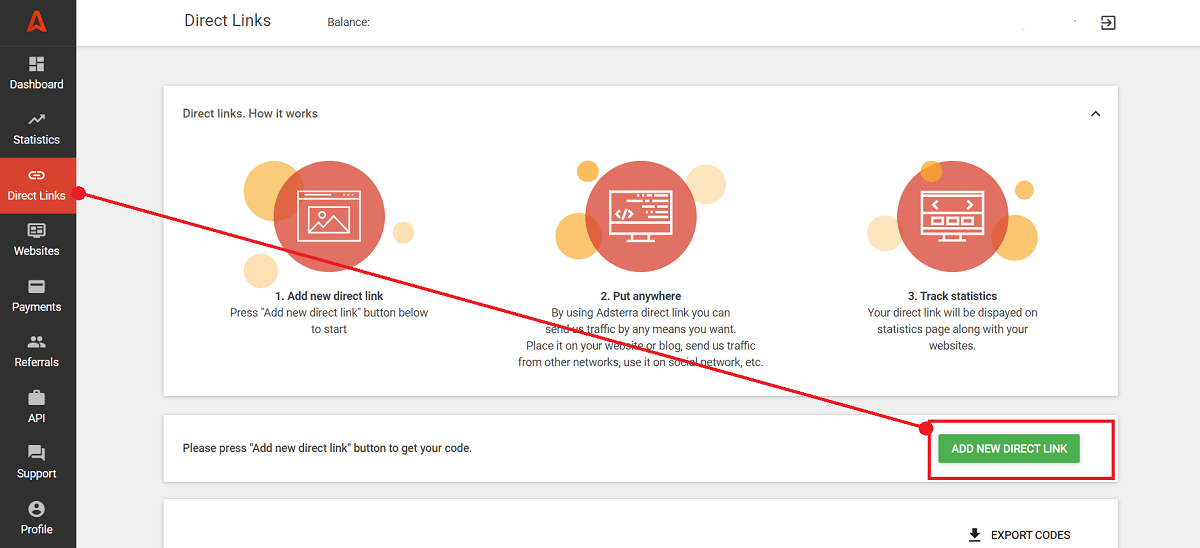
If you don’t have any website or want to make money on your mobile app or social media account (FB, IG, TikTok), you will need to choose another button which is called ADD NEW DIRECT LINK (it is also available on the vertical toolbar).
So let’s move on and see all possible options. We will start from adding a new website.
#1 How to add your website to Adsterra
Let’s open the Websites page. For now, you don’t see any items added. It’s time to add your first website. Click the ADD NEW WEBSITE button.
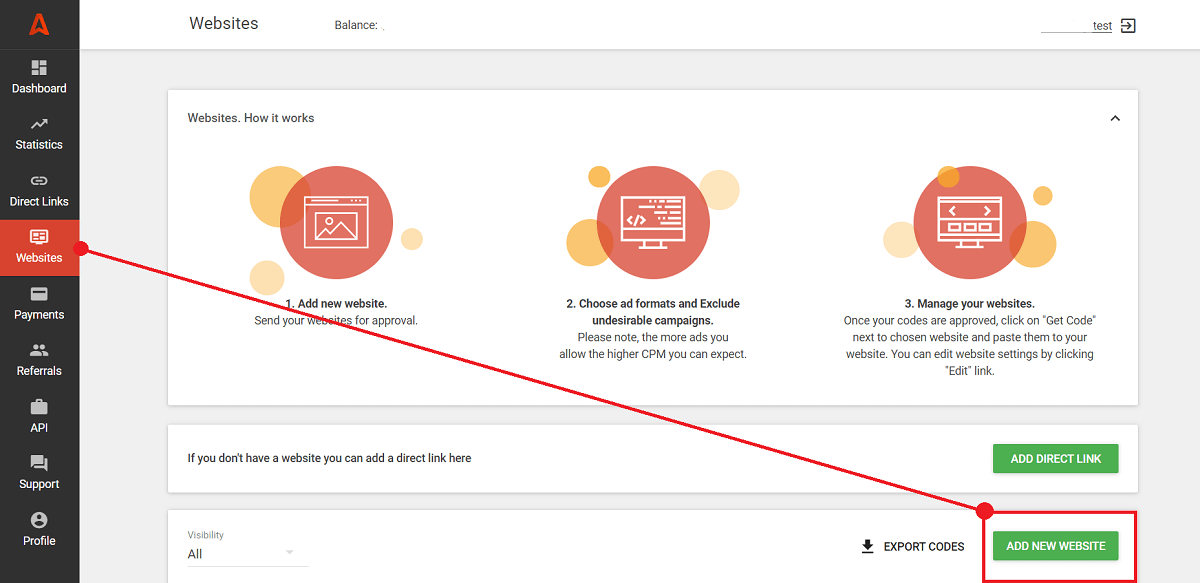
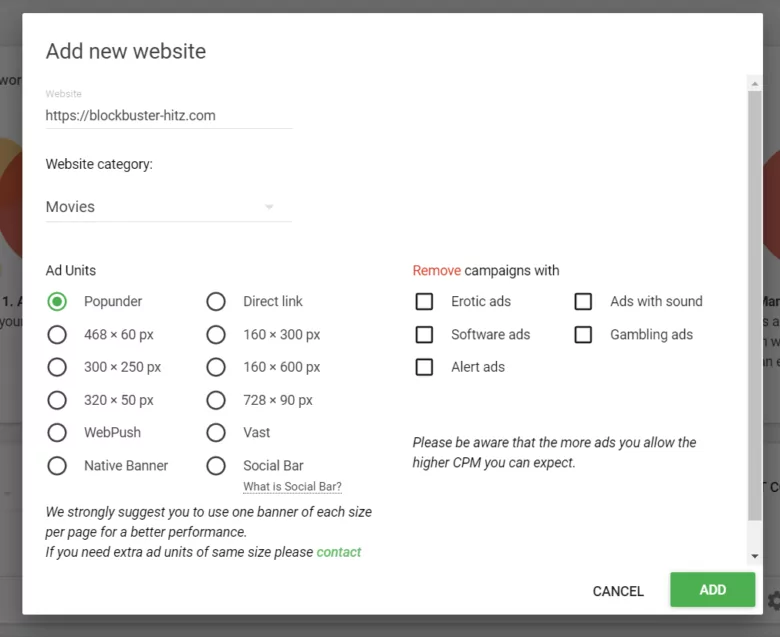
In a new pop-up window, you choose what ad codes (ad formats) to put and on which website. That’s the initial step to making money with Adsterra. Although pretty clear, let’s examine the main fields one by one.
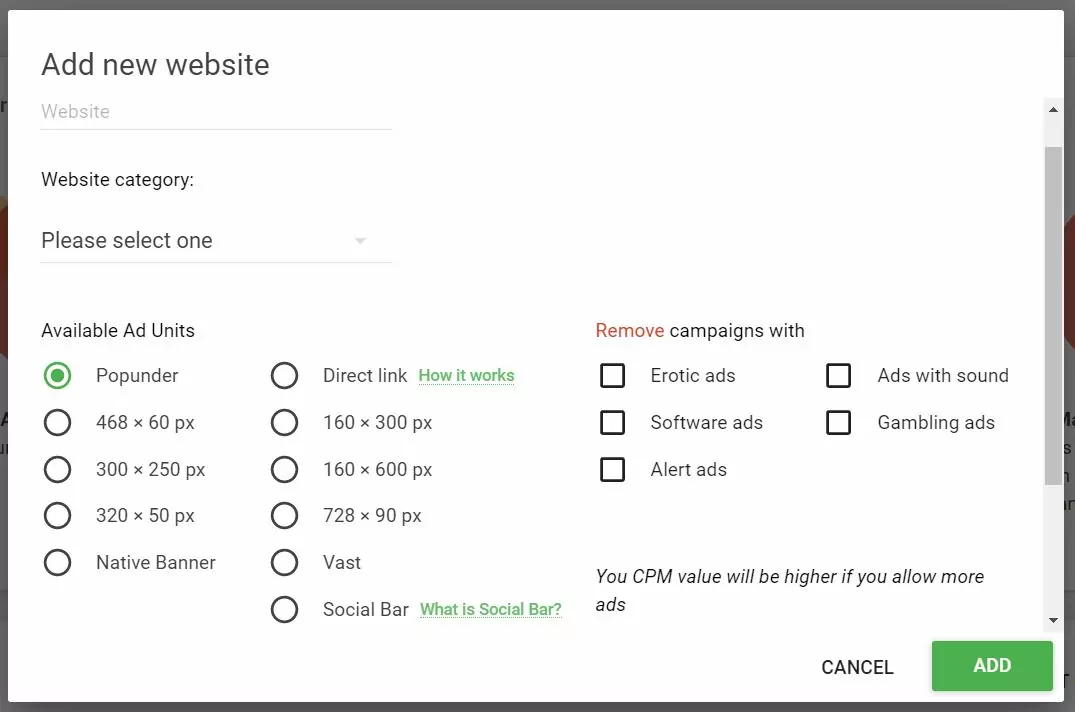
On the Add website window, you need to fill out several fields.
- Your website URL. Please enter the full URL, including HTTPS.
- Your website category. It’s a dropdown where you pick the category of your website traffic (movies, books, anime, news, etc.).
- Available Ad Units. These are ad formats that are going to be displayed on your website. Let’s assume you choose the Native Banner format. This means that your website users will see ads designed for this format. Advertisers that prefer to promote their products via this format will display their ads on your web pages.
- “Remove campaigns” filter. Here you check which advertising types are unsuitable for your users. E.g., these might be ads with sound.
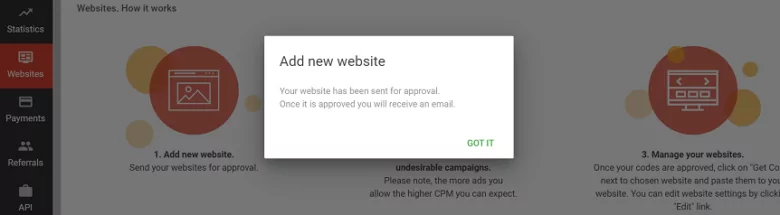
When it all done, please click the ADD button. Your domain will be sent for approval, and you will get this service message (below). Now it’s time to check if the website has been verified and copy the code (or ad script) to put on your website.
Getting your website verified
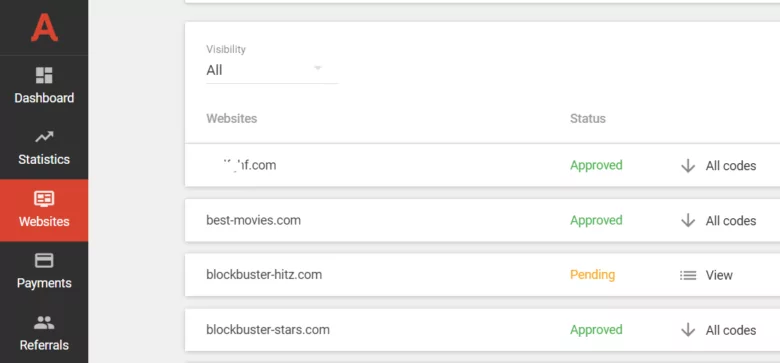
Usually, the website approval is amazingly fast. While on verification, the status of the domain will be Pending, then it changes to Approved. You can check the status on the Websites page. You will get the email when the website is approved, as well.

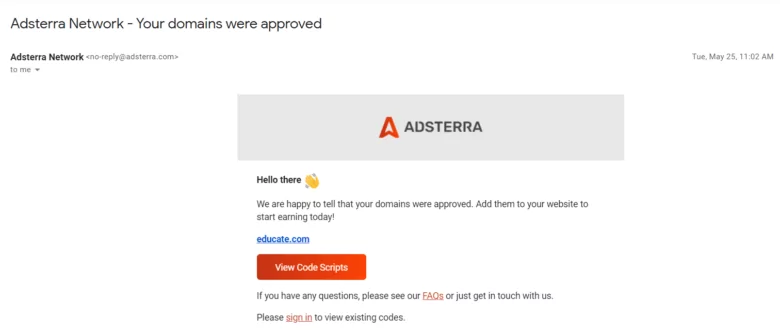
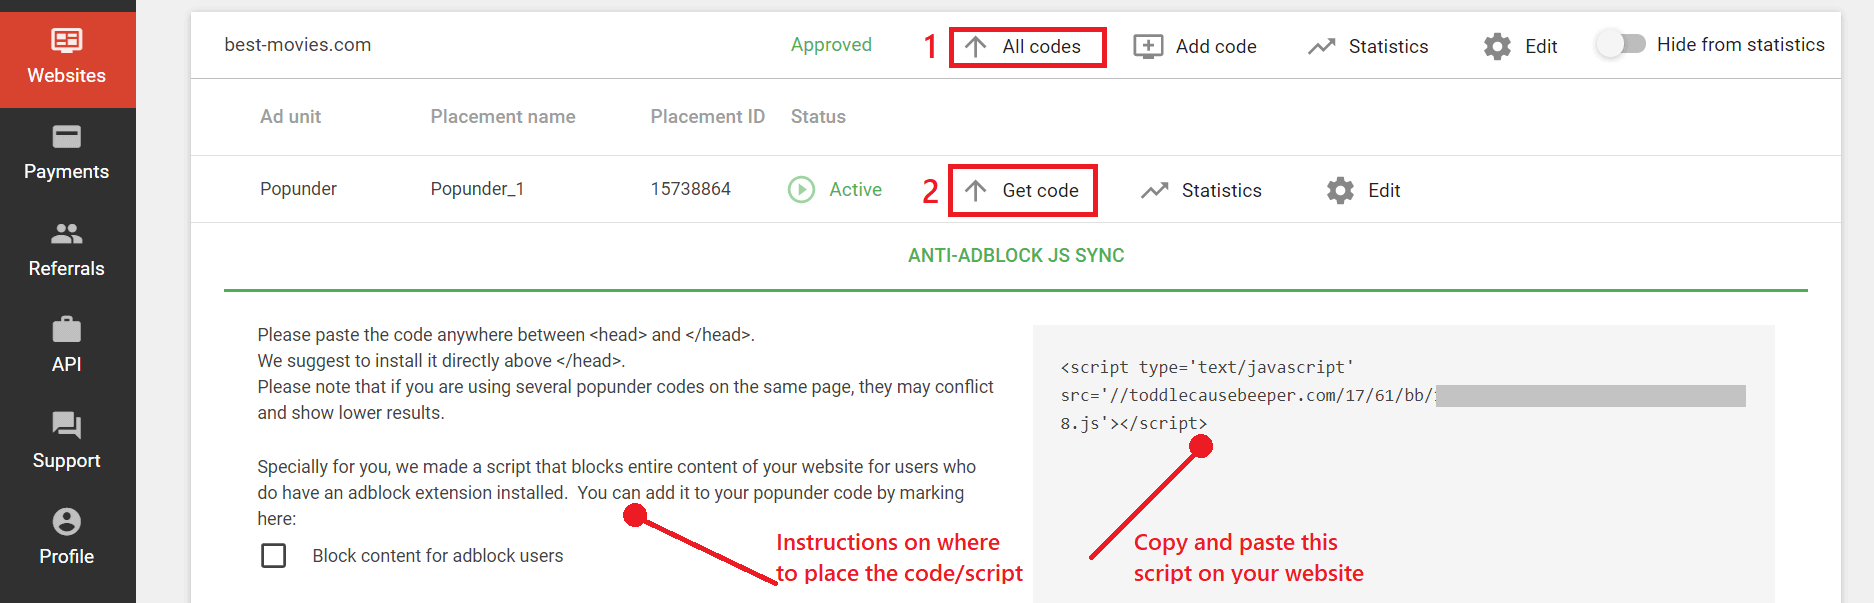
Getting Adsterra ad codes/scripts after the website has been verified
1. You can copy the code from the service email (check the inbox)
We successfully passed the verification and got an email with the code script. You can copy this script right from the email by clicking the button View Code Scripts.
2. You can copy the code from your account
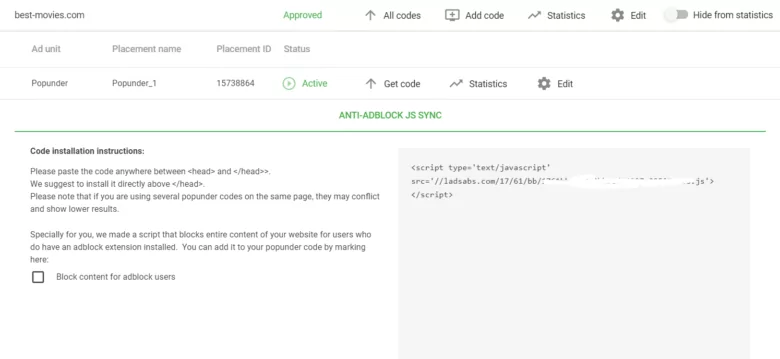
Another way of getting the code script is to take it from your publisher’s account. By this time, your website status will change to Approved.
From the Websites page, click All codes → Get code. On the drop-down window, you see the script. You need to copy and paste it on the website. On the left, there is a short instruction on where to place the code. Please read it carefully as the instructions vary depending on the ad format.
Managing your websites and ad codes
You sometimes want to combine ad formats on one website, add new codes and disable that you don’t need. Let’s see how to manage this easily.
On the Websites page, find the domain you want to edit. To the right of the domain, you see a toolbar.
Let’s examine the icons on the toolbar.
- You can get the code as we did it earlier by clicking All codes → Get code.
- You can choose Add code and generate a new script for another ad format.
* You’ll need to wait for another email with approval. - You can check this website’s performance by clicking the Statistics button.
- Or, you can edit the types of filters you put when first added a website.
* But these changes will be applied to the new ad codes. - The toggle ON state will hide this website from your statistics.
#2 How to get ad codes to monetize traffic with no website
Don’t have a website? You can make a profit with your mobile app or social traffic using our universal Smart Direct Link tool. Now we will outline the main steps for how to request one, but you can read our definitive guide Smart Direct Link Monetization Guude as well.
First, you will need to open the Direct Links page from your account. Here you click the ADD NEW DIRECT LINK buton and choose the parameters you need.
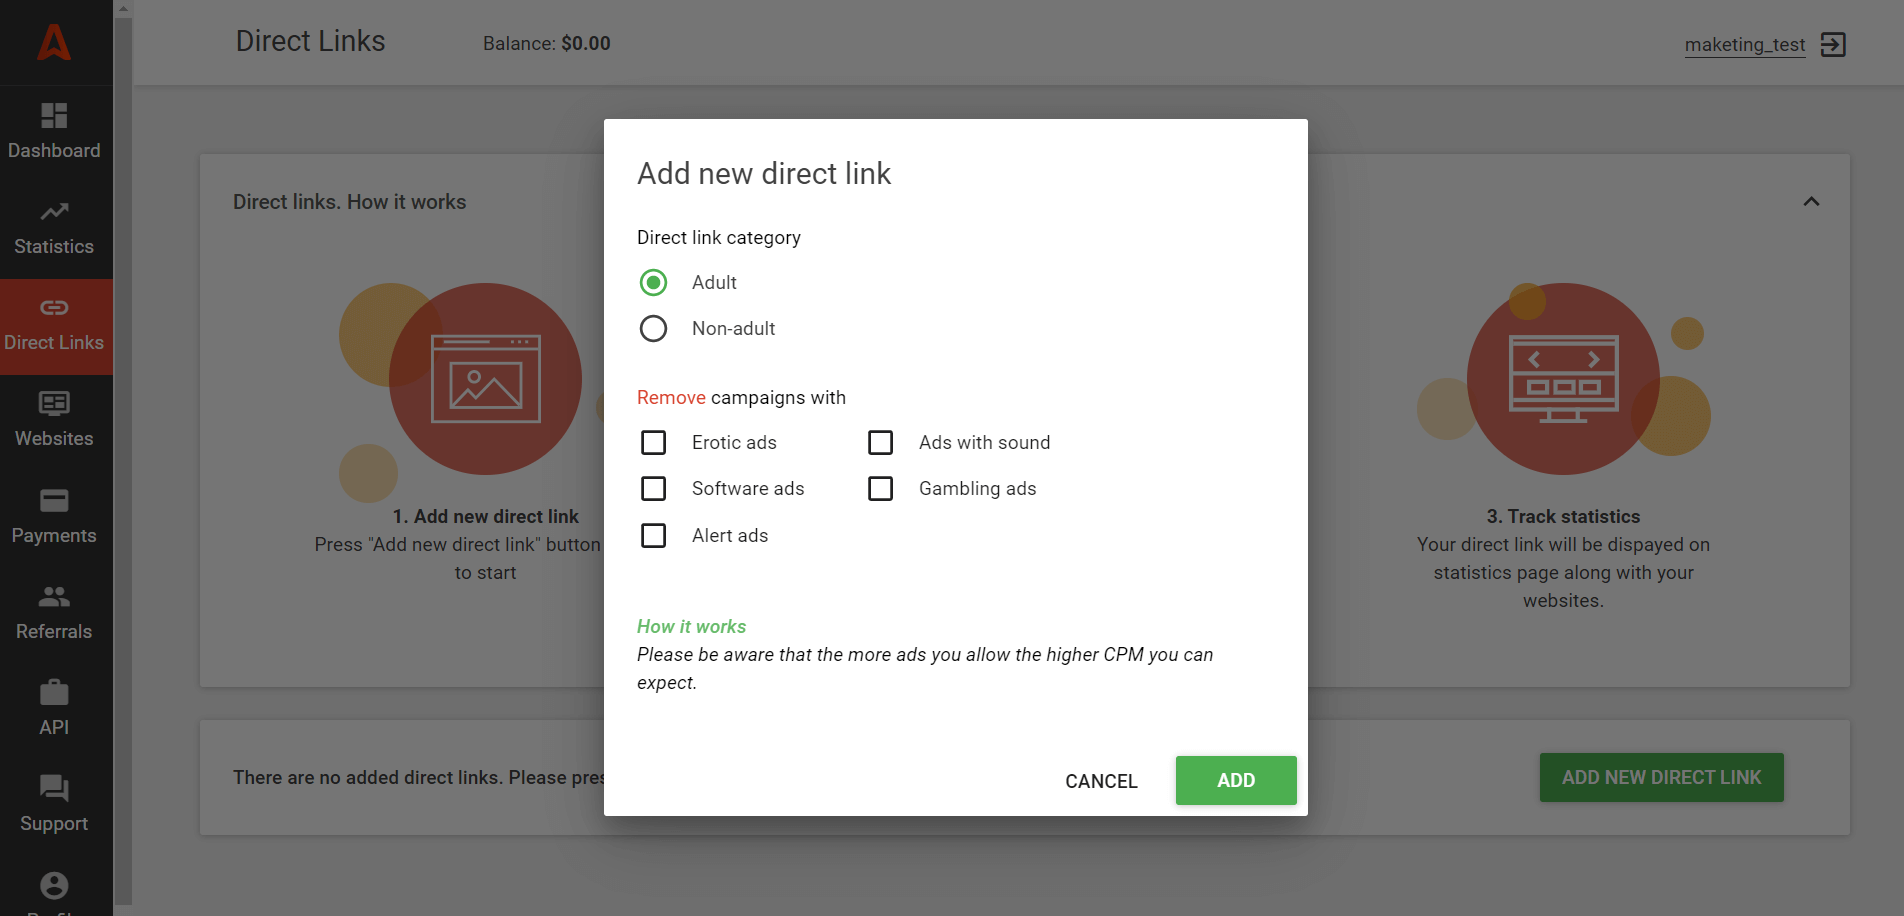
While applying for a Direct Link’s code you’re able to set up its category and put filters on those ad types you don’t want to monetize. Clich ADD after you make all settings.
Done! After we approve your request, you can copy the script from your account (also, from the Direct Links page) or from the system email you will get from Adsterra.
All Adsterra ad units you can earn with
Although this is not a part of our guide, it’ll be helpful to give you a short overview of all Adsterra ad formats. This will help you make the best choice.
If curious about all pros and cons of each monetization option, save this quick guide to Adsterra ad formats.
Monitoring your revenues | Statistics reports
As we said earlier, Adsterra Self-Service Platform for publishers is a control center. Once you add a website, you can track its performance and manage all ad placements with regard to metrics. That’s when you need the Statistics reports.
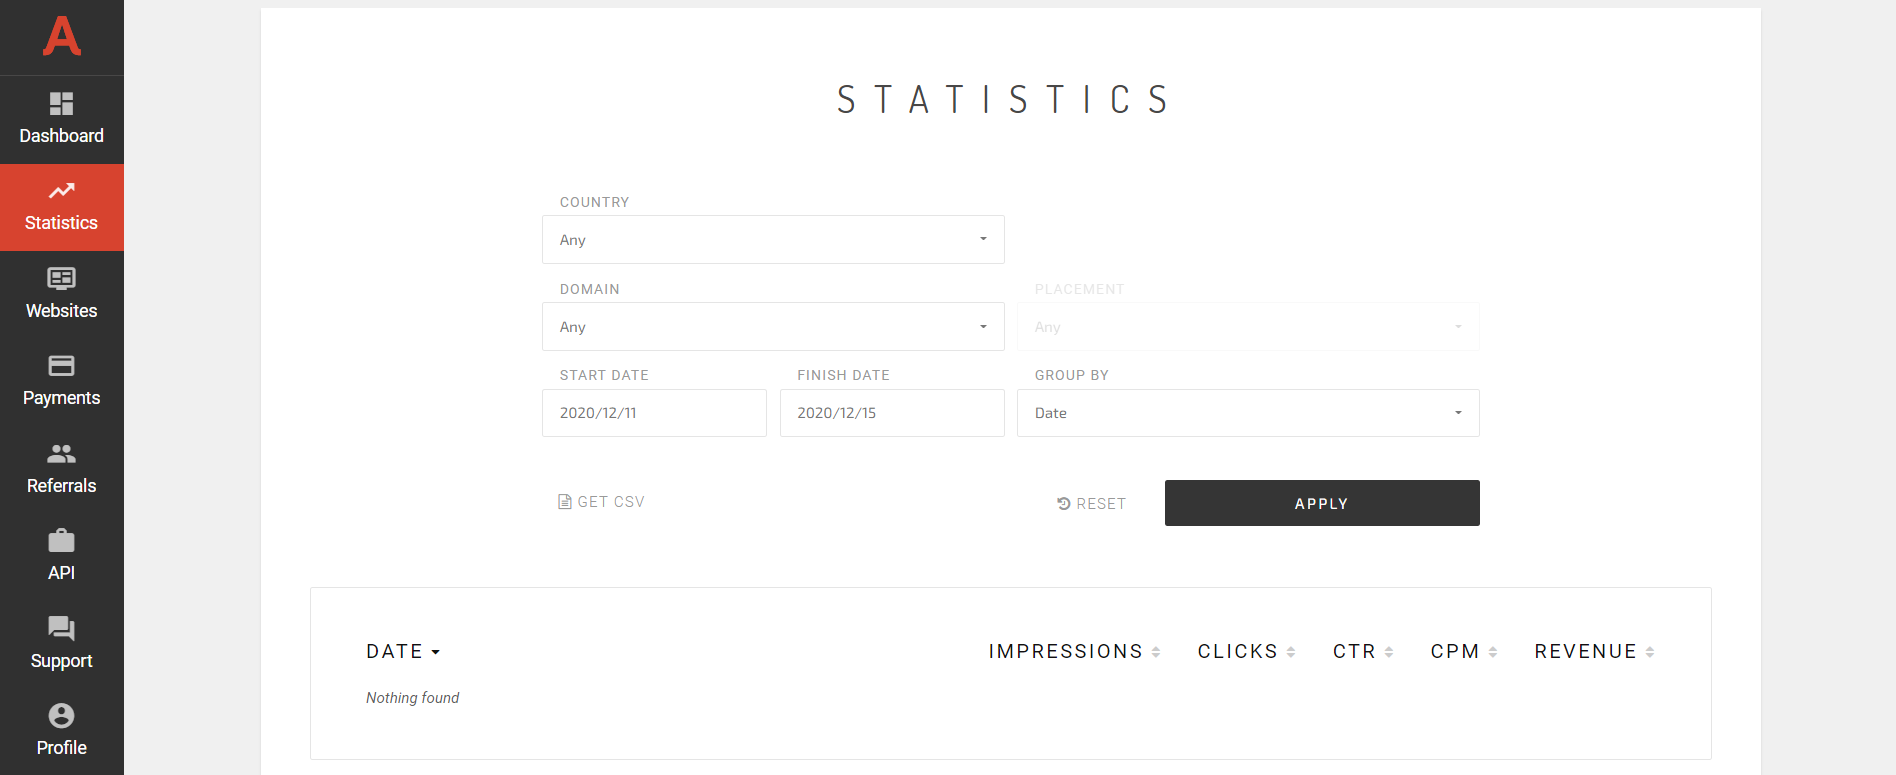
From the control panel on the left, hit the Statistics tab. Since you haven’t started monetizing yet, you will see the empty cells waiting for the future great numbers to appear.
What key website monetization metrics you can check:
- IMPRESSIONS (how many times your ads were shown),
- CLICKS (how many times users clicked on ads),
- CTR (click-through-rate, or the number of clicks on an ad divided by the number of ad impressions)
- CPM (how much advertisers has paid for 1000 impressions of their ads on your website). CPM rate is calculated automatically for each website and depends on traffic quality. It is based on many parameters: website visitors’ country, device, browser, OS, ad formats you use on your website and many others.
- REVENUE (how much you have earned).
On your Statistics page, you can change the start and finish date to compare the reports by various timeframes.
Group websites’ stats by date, domains, placement, country, device format, or operating system.
The hit on the export icon will start downloading your .CSV report.
#3 Publisher’s profile | How to change payment methods and personal data
On your Profile page (hit the Profile tab from the left), you see all your credentials you typed in on the registration stage, as well as the preferred payout method. If needed, you may enter another name, change the payment system, and the messenger account name.
* From your Profile page you can’t change the email to which your account is attached, and your login.
* On payment days, we temporarily block the fields with payment systems details. We do it to prevent the payout delay or turn-down.

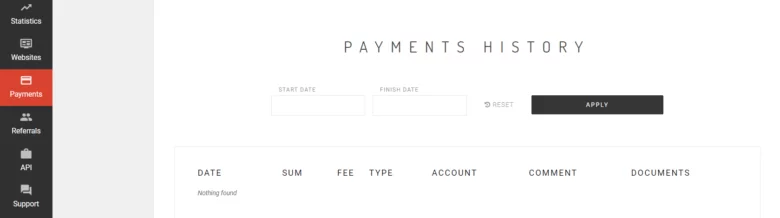
#4 Transparent payment reporting
Open your Payments tab. The first part of the page is about payment rules. All hints on minimum payouts, transfer fees, payout dates are here. Please, read it carefully to proceed your website monetization smoothly.
Next comes the payment history table with filters. Once you start getting passive income, you check all your scheduled and released payouts here.
What do these fields mean?
- DATE — here you can check when the next payout date is, and when previous payments were released. Along with recurrent payouts, you find here all balance adjustments with the reasons mentioned in the COMMENT field.
- SUM — the number of your earnings with Adsterra within a period.
- FEE — the commission taken by the payment system for money transfer. TYPE – the type of financial operation (e.g., ‘next’ for the next payment).
- ACCOUNT — your account details.
- COMMENT — a detailed description of the financial operation.
- DOCUMENTS — files that confirm payout.
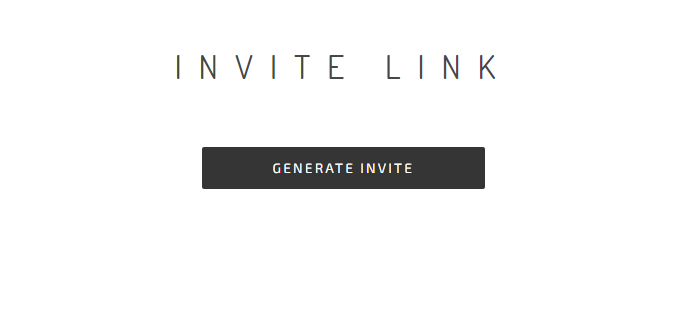
#5 How to get an extra +5% lifelong income: Adsterra referral link
That’s, probably, the easiest way of getting passive income. On the Referrals page, click the GENERATE INVITE button and share the unique link when recommending Adsterra to your readers and partners. Once somebody signs up to Adsterra via your link and starts monetizing, you’ll be getting a payout equal to 5% of their income. Forever!
#6 Adsterra live chat support and knowledge base
We tend to automate everything, except the warmth of our 24/7 communication with partners. You may connect with us via the chat icon in the lower corner of the screen.
To some questions, the best answer will be a tutorial from our blog, so you will get the link to read it out. Sometimes the top choice is to look through our FAQ base with guides and tips, and you’ll immediately be offered the most suitable article. But sometimes only live support works, and we are proud to be the best-in-class here.
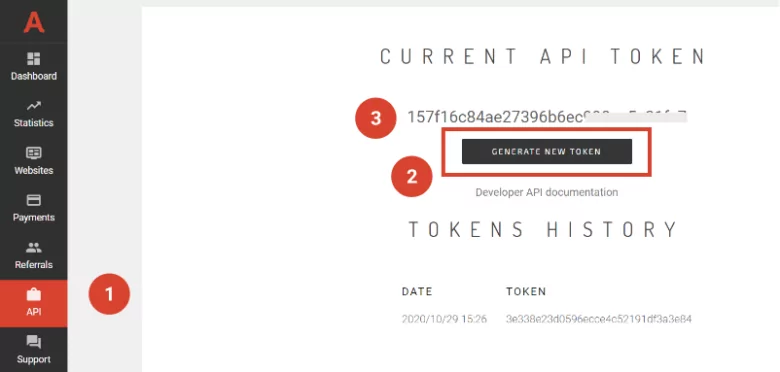
#7 Advanced stats tracking with Adsterra API
With Adsterra Publishers API, you can easily pull the statistics on your websites’ core metrics. This will help a lot when you use third-party tracking services or dashboards. No need to export yet another one .CSV, all data fetch automatically: CPM, CR, clicks, and revenues metrics.
On the API tab, you generate a unique API token that will allow for sending your Adsterra statistics to other applications, systems, and dashboards (without sharing your credentials or any extra data.
Need more hints? Dive into the long read on how to use Adsterra Publishers API.
Why choose Adsterra for website monetization
Choosing a partner for website or blog monetization is a leap of trust. You need a bit more than a good welcome guide. Here is the list of points that might convince you to consider Adsterra as the AdSense alternative and your business partner.
- Fast and easy start
Instant approval; clear instructions on where to put the ad codes. - Vast pool of advertisers
20K+ campaigns run at a time. - High CPM rates
Adsterra AI optimization makes sure your website visitors see the most relevant offer from our advertisers. - Multiple ad formats
Popunders, Web Push, Banners, Native Banners, Vast (video), Social Bar (brand new), Direct Link. - Friendly payout policy
Automated 15NET payouts are starting from $5 (for Paxum and Webmoney). Top-choice payment methods: Bitcoin, USDT (Tether), Paxum, PayPal, Webmoney, WireTransfer. - Security solutions
No malware thanks to our 3-level security system. - Anti-AdBlock
A powerful feature that allows for monetizing 100% of your traffic. - Partner care
Caring managers and live chat support highlighted by 80% of our partner as one of the hit advantages.
Now, you’re ready to start
Quite a long ride, right? Only when you read the guide without taking any action 😉 With Adsterra, you natively start generating revenues from your website or blog in a few minutes. The biggest thing here is that there will be many challenges on your way to making a solid income whatever means you choose. Adsterra will stand by your side when you’ve just started planting these seeds of website monetization and when you’ve grown your business to six-figure profits. You’re half-step from your next great leap to profit.
A Guide to Placing Profitable Ads

WordPress owns a 65% share of the content management systems (CMS) market. The platform powers about 42% of all websites and blogs. For Adsterra publishers, WP has also become one of the top-5 blogging platforms. Growing business online, they are naturally willing to monetize WordPress websites. And today, you are going to learn how to put profitable ads on your WP-based site so that you could make money with no extra efforts.
In this guide, we’ll go through the steps of adding Adsterra Popunder, Social Bar, Native, and Display Banners’ ad codes. If you want to monetize your WordPress blog with VAST pre-roll videos, save this special guide by our expert.
Before you start WordPress monetization: tech aspects to consider
As we mentioned before, WP is the friendliest CMS as it offers loads of instruments that facilitate your routine: text formatting, adding images and videos, adding tracking systems, and email subscription forms. On the other hand, this provokes confusion when you need to get a clear flow of HOW TO add an ad code to your page. Themes vary, access rights vary, interface layouts vary. You also might be using several plugins for adding HTML and JS codes. For this guide, we have chosen the most common user flow.
STEP#1. Getting Adsterra ad scripts from your Publisher’s account
Before placing an ad script / code, you need to generate it on Adsterra platform. It’ll take less than 5 minutes.
1. First, you need to log in (or sign up) as a Publisher on adsterra.com.
2. After you’re in, on the left you’ll see the control panel with all your tools and services. Choose the Websites tab. Click the green button Add new website.

3. In the Add new website window, please fill out the fields:
- Add your website URL.
- Choose your website category from the list (if nothing suits you, choose Other).
- Select one Ad Unit (each time you can add just one code for one unit: Popunder, Social Bar, Web Push, Banners, etc.). Let’s choose Popunder or Social Bar this time as we’ll need it for the next step.
- You can also put filters to remove ads that you don’t want to run (like those with sound).
- Click the Add green button.

4. After you added a website, you’ll see a notification that your website is waiting for approval (Pending status). Approved sites are green. Wait until Pending status changes to Approved.
5. Ok. You see the green Approved status. Click All codes – Get Code. Here you see a piece of code (on the right) and a short instruction where to put it (on the left).
💡 Copy the code and keep t as we’ll need it later.


STEP #2. How to put ads on a WordPress website
Ok, you have successfully generated your ad script. Let’s see how and where you can place it on your WordPress website to monetize from ads. We’ll go step by step to make each action clearer.
Put Adsterra ads to all pages (best for Popunder and Social Bar)
We decided to break all formats into two groups. Popunders and Social Bar are too special to mix them with classic units. These two don’t consume any space on a web page’s layout; it means, you can show them throughout your whole website.
There are two ways you can place Pops or Social Bar scripts. Let’s move on to observing each of them.
CASE 1. Use WordPress Theme Editor to place Popunder or Social Bar
- Log in to your WordPress admin panel. Usually, it looks like this: https://[yoursite.com]/wp-admin.
- Find the Appearance section (generally, it’s on the left) and click on it. Choose Editor or Theme Editor.
- Find the theme’s header.php file.
- Copy your Adsterra code (see STEP#1).
- For Popunder: paste the code before the closing “</head>” tag. For Social Bar: paste the code before the closing “</body>” tag.
- Click on ‘Update file’ or ‘Save’ . That depends on your WordPress version.


CASE 2. Using the WordPress Widgets section to put an ad code
Choose this way when you can’t change your WP theme.
- Just like in the first case, log in to your WordPress admin panel.
- Find the Appearance section and choose the Widgets tab.
- Select Custom HTML from the list.
See how it works on the screenshot below.

4. Check the theme element (we ticked Sidebar) and click Add Widget; the widget will open in the element section. Paste Adsterra Popunder or Social Bar code in the Content field. Make sure you have copied the whole piece of code. Otherwise, it won’t work.
5. After you paste the code in the widget, click Save. You’re ready to monetize your WordPress website with Popunder or Social Bar ads!

If you use more than one Popunder, they may conflict with each other and lower your CPM. It is better to ask your manager to increase the frequency of impressions on one specific ad format rather than multiply them.
Put Adsterra ads to selected pages (best for Display or Native Banners)
On the Adsterra platform, take the same steps you did for getting a Popunder or Social Bar ad code.
On WordPress, place the codes exactly where you want the banners to appear on your page. Anywhere in the page body (but NOT between the “HEAD” tags)
You can place the ad codes with Custom HTML widgets as we did earlier. There are 2 ways to edit custom widgets.
Way 1. Choose Appearance, then pick the Widgets tab, choose the Custom HTML element from the list and click Add Widget. Place the code in the Content field and click Save.
Way 2.
1. Click Appearance – Customize from the main toolbar.
2. Choose the Widgets tab.
3. You can now pick any Widget (they are named according to their placement: home sidebar, footer, etc). Click Add Widget.
5. Now it’s time to choose the type of widget. You need the the Text Widget.

6. After you choose Text Widget, remember to switch to Text mode (see the picture below).
7. Copy and paste your Adsterra code in the blank field.
8. Click the Publish button.

We strongly recommend you to use one banner of each size per page for better performance. If you need extra ad units of the same size, please contact our managers.
Tips on how to work with ad codes and monetize WordPress websites wisely
Now that we have gone over the steps that a WordPress website owner needs to take to monetize their website, let’s highlight some helpful tips.
- Start with fewer ad formats; one or two will be enough. With fewer ads, it’ll be easier to monitor how effective your ads are and how your audience reacts to them.
- Place banners on the most visible spots. But make sure they don’t overlap the content or navigation buttons.
- Please copy and paste Adsterra’s ad codes instead of typing them in. One typo and the code won’t work.
- One code is always one ad unit. To place two ad units (e.g., two 160×300 banners) on the same page, you’ll need to generate two codes. Please don’t put the same code twice. In this case, your statistics will be incorrect.
- Some ad units have advanced settings. For Popunders, you can set frequency, which means how many advertising offers one user will see within a given time. Learn how this setting might affect your CPM.
- Please check twice all the settings that you have made.
Can WordPress websites be monetized? Now you know the answer
We have examined the sequence of actions you’ll need to make to monetize your WordPress website or blog with Adsterra ads for free. You can either choose classic formats like popunders or try a super-engaging Social Bar. By now, Social Bar has been on the peak of interest. It is easy to install and impressive in performance – even our first testers got up to $300 weekly profit on Tier 1. How to make more money with Social Bar? Find the answers in this guide.
If you’re looking for specific formats to monetize a WordPress blog, take a look at Native Banners, as they are friendly to long-read articles and are not blocked by adblockers.
That’s it. Now you are ready to make money with your WordPress website!
How to Monetize Blogspot Websites


123 Guide on How to Monetize Your Blogger (Blogspot) Website
Despite its decreasing popularity over the past years, Blogger (or Blogspot) remains one of the most usable platforms for building websites. Owned by the tech giant Google, it offers multiple opportunities for website and blog owners. Google hosts all blogs that initially belong to the subdomain ‘blogspot.com’. Logically, webmasters and publishers can easily extend their inventory with Google products like AdSense. Those of you striving to monetize a Blogspot (Blogger) website instantly can rely on Adsterra ad formats as the AdSense alternative. This 123 Guide will give you sure-fire instructions on how to monetize a Blogspot-based website or blog with Adsterra ad formats. No matter the level your business is at, and whether you’ve already built a reputation or have just started with planting those seeds of trust, you’ll be able to implement these tips and make money with ads.
Which Adsterra ads can you put on a Blogger / Blogspot website?
Blogger is very easy to set up and run, so placing ad codes is also a smooth process. On this platform, you can grow your business with the following Adsterra ad formats:
- Social Bar or In-Page Push ads
- Native banners
- Display banners
- Popunders
- Direct Link
Adsterra Smart Direct Link is the easiest way of getting profit from ads. You will only need to generate an ad code on your Adsterra account and place it anywhere on the website as a regular link. Most-used places are texts, buttons, images, etc. Find some secret monetization tactics in this Guide to Direct Link.
How to get Adsterra ad codes
Generating Adsterra codes is a universal set of actions that require less than five minutes. Let’s all of them one by one.
1. Please log in (or sign up) as a Publisher on adsterra.com.
2. From the control panel on the left, choose the the Websites tab. Click the green button Add new website.
3. A new window will open. Here you need to fill out the fields and choose the ad format.
- Add your website URL.
- Choose your website category from the list (choose Other if you don’t see suitable categories).
- Pick one Ad Unit (each ad code is unique).
- See what filters you can tick to remove the unwanted types of ads.
- Click the Add green button.
4. You’ll see a notification that your website is waiting for approval (Pending status). Approved sites are green-colored. Wait until Pending status changes to Approved.
5. After your website status changes to Approved, click All codes – Get code. Here it is! A piece of code and a short instruction on where to put it.
Copy the code to the clipboard.
Step-by-step instructions for putting ads on your Blogspot website
What is really inspiring is that you need the very same set of actions to place any of the above-listed Adsterra formats.
There are two ways of adding ads to monetize a Blogger-based website or blog.
If you need an ad placement to appear on every page and be fixed to the page’s structure (e.g., a sidebar), you should put Adsterra codes inside the Blogspot theme.
** Please bear in mind that popunder ads are not attached to any UI element of the website, so you don’t have to look for a vacant place on the website.
The second way of showing adverts to your blog’s visitors is to place them on a blog post page. In this case, your audience will only meet ads when they open this page. It could be a homepage, for instance.
Let’s follow these simple steps right now.
Placing ads via Blogspot themes
When you need advertising units to appear on every page, you should use your website theme settings. After you log in, on your left-hand menu, find and hit the Layout tab. You see how the skeleton of your website looks like, all of its blocks like header, footer, sidebars, etc.
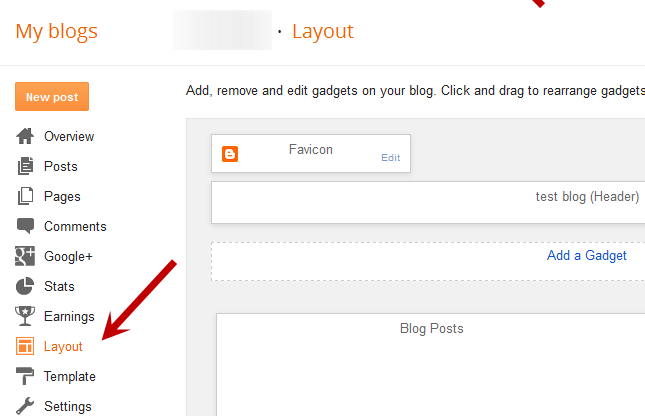
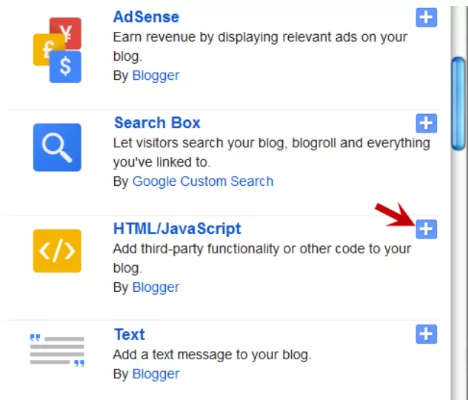
Click the Add a gadget section and choose HTML/JavaScript from the list.
Paste the code you generated at Adsterra into the Content field and click Save.
After you add a gadget, you will see your new HTML/JavaScript element inside the website layout. Drag and drop your gadget if you want to place native or display banner somewhere else, like the website header or sidebar.
** Please bear in mind the instructions you got while generating the code. If they recommend putting the format before the closing ‘</body>’ tag, you can’t just drag and drop your Blogger gadget to the web page header.
Placing ads on a separate blog post page
Sometimes you need to put ads on specific web pages avoiding all the rest. This might be very helpful if you want to test a new format or leave some pages free of advertising (like those with privacy policy).
On Blogger, you can do it with just two steps:
1. Open the post where you want to show ads. Switch to HTML view by clicking the icon on the upper left corner.
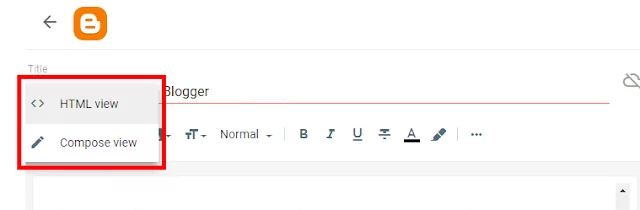
2. Paste the code snippet that you copied from your Adsterra account. Make sure you place the code according to Adsterra instructions. For instance, to add a popunder, you will need to find the tag on your HTML post and paste the core before this tag.
That’s it!
What to keep in mind while monetizing your Blogspot website
- Please don’t oversaturate your web pages with ads. At first, it might seem the fastest way to profit, but in the end, your statistics could return massive churn rates.
- Avoid placing more than one popunder ad code on the same page as they might conflict.
- Having added a new placement, open the preview page to make sure the ads don’t overlap the content or navigation buttons. If they do, try to find a better placement. Poor UX might strongly affect your CPM.
- When generating a new ad code, please, read a short instruction. At Adsterra, we recommend where exactly to put this ad.
- Each ad code is unique. You can use it only for one placement on one page. To get, say, two banners, you will need to generate two ad codes. This is critical for the correct display of your statistics.
- Some ad placements have advanced settings available on request. E.g., you can ask for changing your popunders frequency settings (how many times one user will meet ads within a given time).
Conclusion
We have walked through Blogger / Blogspot websites monetization basics. With Adsterra as an AdSense alternative, you can also use a variety of formats, adjusting them to your audience and website design.
If you are looking for a way of instant earning, rely on Adsterra. One-minute approval, no limitation to your website traffic volume and rankings, and the fastest support can become the game-changing factors to your business growth.
Now you are ready to earn with your Blogspot website!
For more such interesting article like this, app/softwares, games, Gadget Reviews, comparisons, troubleshooting guides, listicles, and tips & tricks related to Windows, Android, iOS, and macOS, follow us on Google News, Facebook, Instagram, Twitter, YouTube, and Pinterest.


