 Haven’t switched to FlyingPress yet, huh?
I did and saw a major difference compared to WP Rocket (mostly in actual browsing speed). Then I made this table comparing the features in FlyingPress vs. WP Rocket vs. SiteGround Optimizer. It also shows you why FlyingCDN (which uses BunnyCDN’s geo-replication + Bunny Optimizer) is much better than RocketCDN since it only serves files with no additional features.
Once you compare them side by side, it’s easy to see why so many people are switching to FlyingPress. So of course, I had to write this tutorial on configuring the FlyingPress settings.
This was WP Johnny’s recommendation. I was lucky enough to have him help me with some optimizations to improve speed/core web vitals and switching to FlyingPress was one of them. He set it up initially, then I dug through the settings + documentation and made tweaks after.
FlyingPress was built by Gijo Varghese who runs the WP Speed Matters Facebook Groupand has developed other plugins which usually have a perfect 5/5 star rating. While some people are turned off by the initial price of FlyingPress, it’s actually cheaper than WP Rocket long-term considering renewals are $42/year (FlyingPress) and $49/year (WP Rocket) for 1 site. Especially since WP Rocket stopped offering renewal discounts. SG Optimizer is hyped up by SiteGround but is unstable and lacks features. So if you’re not getting good results, I would try FlyingPress.
If you switch, do Gijo a favor and take before/after screenshots of your reports and send it to him. You could even post them in the FlyingPress Facebook Group. I’m sure he’d appreciate it.
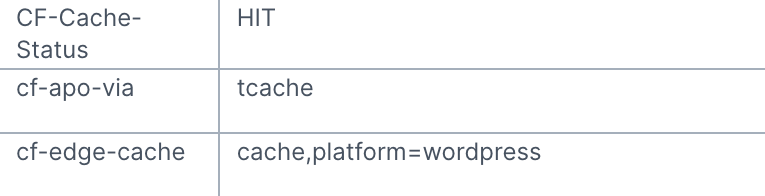
| SG Optimizer | WP Rocket | FlyingPress | |
|---|---|---|---|
| Server-side caching | ✓ | x | x |
| Delay JavaScript | x | ✓ | ✓ |
| Remove unused CSS | x | Inline | Separate file |
| Critical CSS | x | ✓ | ✓ |
| Host fonts locally | x | x | ✓ |
| Font-display: swap | x | ✓ | ✓ |
| Preload links | x | ✓ | ✓ |
| Preload critical images | x | x | ✓ |
| Fetchpriority resource hint | x | x | ✓ |
| Lazy render HTML elements | x | x | ✓ |
| Lazy load background images | x | Inline | Helper class |
| Exclude above the fold images | By class | By URL | By number |
| Add missing image dimensions | x | ✓ | ✓ |
| YouTube iframe preview image | x | ✓ | ✓ |
| Self-host YouTube placeholder | x | x | ✓ |
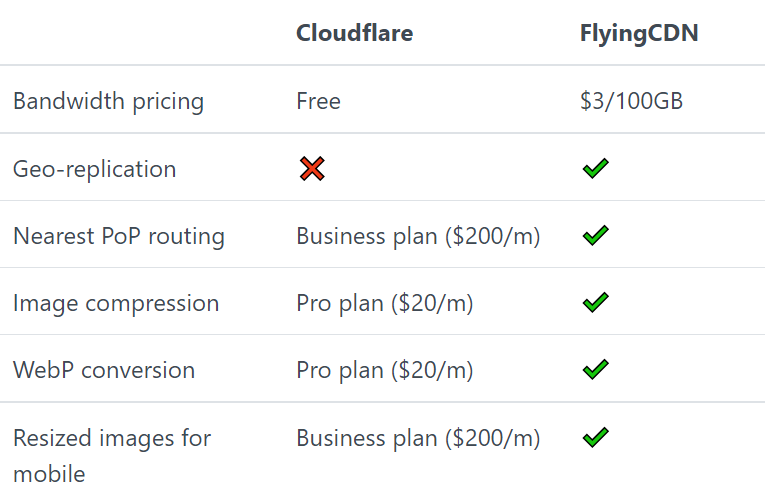
| CDN (beyond Cloudflare) | SiteGround CDN | StackPath | BunnyCDN |
| CDN PoPs | 14 | 60 | 93 |
| CDN Tbps | N/A | 65 | 80 |
| Dynamic caching | Premium | x | Vary cache |
| CDN geo-replication | x | x | ✓ |
| CDN image optimization | ✓ | x | ✓ |
| CDN image resizing for mobile | x | x | ✓ |
| Documented APO compatibility | x | x | ✓ |
1. Dashboard
General information like links to your FlyingPress account, documentation, Facebook Group, open a support ticket, etc. Shows number of cached pages with option to purge/preload cache.
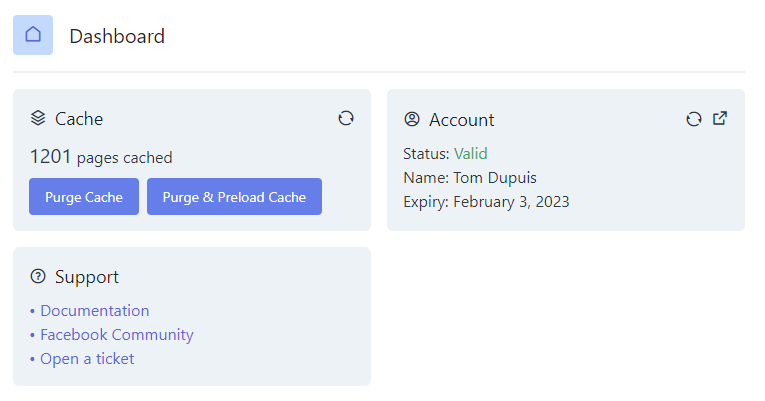
- Documentation – FlyingPress has great documentation. Download the plugin from the FlyingPress website and upload it (key is attached to the zip file and added automatically).
- Facebook community – The FlyingPress Facebook Group is specifically for the plugin, or you can check the FlyingPress changelog. Gijo also runs the WP Speed Matters Facebook Group which is everything related to speed. I love that he is so involved in the community.
- Open a ticket – leads to the contact pagewhere you can get support (the support I received from Gijo was by far the best I’ve gotten out of any other cache plugin’s support).
2. Cache
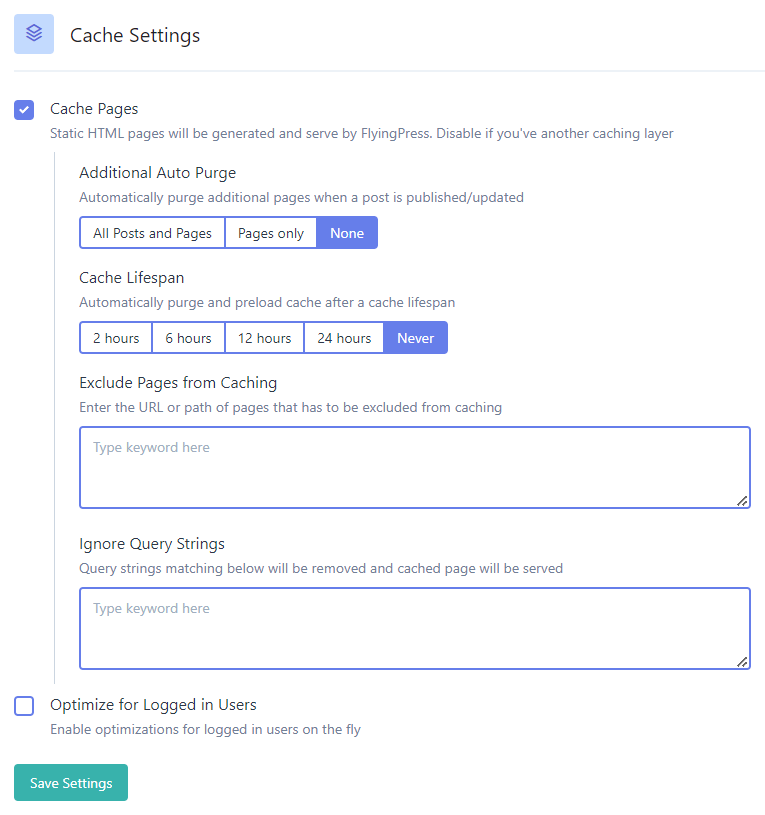
- Cache Pages: On – Gijo’s documentationsays to disable caching in FlyingPress when using APO. However, Brian Li from Kinsta explains how APO is not a substitute for page caching and says to keep it on in cache plugins. I use APO and still have caching On in FlyingPress. If you’re on Cloudways, FlyingPress automatically purges Varnish. To make sure FlyingPress cache is working, open your site in an incognito window and look for FlyingPress’ response header (x-flying-press-cache: HIT) in the first request/HTML page.
- Additional Auto Purge: None in most cases. FlyingPress already detects many URLs and purges key pages when you publish/update posts or update WooCommerce stock. If you have other types of dynamic content that aren’t being auto purged, use the other options.
- Cache Lifespan: Never in most cases, unless certain plugins use shorter security tokens.
- Exclude Pages from Caching: key eCommerce pages, admin/login pages, and several others are automatically excluded from the cache (see list), but you can add more here.
- Ignore Query Strings: if you have query strings that should be ignored and not cached (i.e. ad campaigns), add them here. FlyingPress has a list of query strings it ignores by default. Johnny also has a detailed guide on when to ignore query strings with examples.
- Optimize for Logged in Users: Off – turning it on means pages will remain uncached (dynamic). By turning this setting ON, FlyingPress just optimizes pages for logger-in uses on the fly. Johnny says this can speed up your admin but will probably cause some issues.
3. CSS
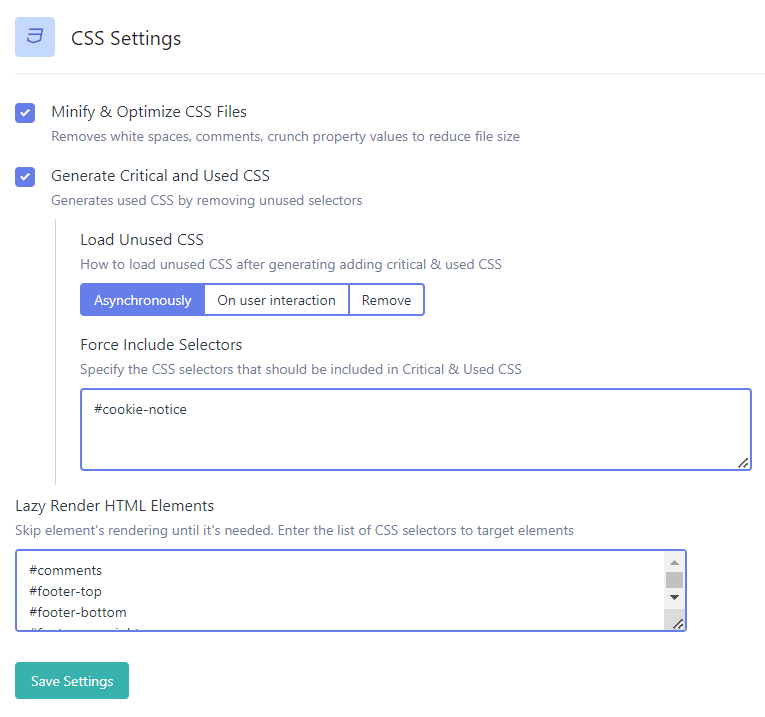
- Minify & Optimize CSS Files: On – minifies CSS as well as other CSS optimizations like rewriting font + background image URLs in CSS files so they can be served from your CDN. Whether you should minify or not and where to minify (cache plugin vs. Cloudflare) is tricky. When using APO, Cloudflare recommends disabling minification in Cloudflare and doing this from your cache plugin. Gijo recommendsminifying CSS/JS in Cloudflare but not HTML, then disabling minify settings in FlyingPress (I assume when not using APO). Johnny suggests leaving minify CSS/JS off for large sites with lots of pages/CSS. Then there’s the fact that minifying from your CDN is supposed to be faster than your cache plugin. Lots of different advice (all from smart people), so I guess just run own test? I use APO so I took Cloudflare’s advice of minifying in FlyingPress and disabling it in Cloudflare.
- Generate Critical and Used CSS: On – critical CSS can fix render-blocking resources by creating a critical CSS file which is injected into the head. Unused CSS removes unused CSS selectors and the new file will be loaded asynchronously from an external stylesheet.
- Load Unused CSS: asynchronously – safest option but read the documentation and test your results. I originally tried “remove” but it broke my website, so I went back to async.
- Force Include Selectors: add CSS selectors to be force included in your critical and used CSS. Gijo gave the example of cookie-notice and sure enough, I have a cookie-notice CSS selector on my site. If there are other selectors you want to force include, add them here.
- Lazy Render HTML Elements – similar to lazy loading images only it’s for CSS selectors. You’ll want to inspect your site in Chrome Dev Tools then copy non-critical CSS selectors loading below the fold (jump to 1:08 in the video). You can do this with CSS selectors like comments (#comments) as well as footer (#footer), then paste them into FlyingPress. Just make sure you check your own CSS selectors since they can be different for each site.
4. JavaScript
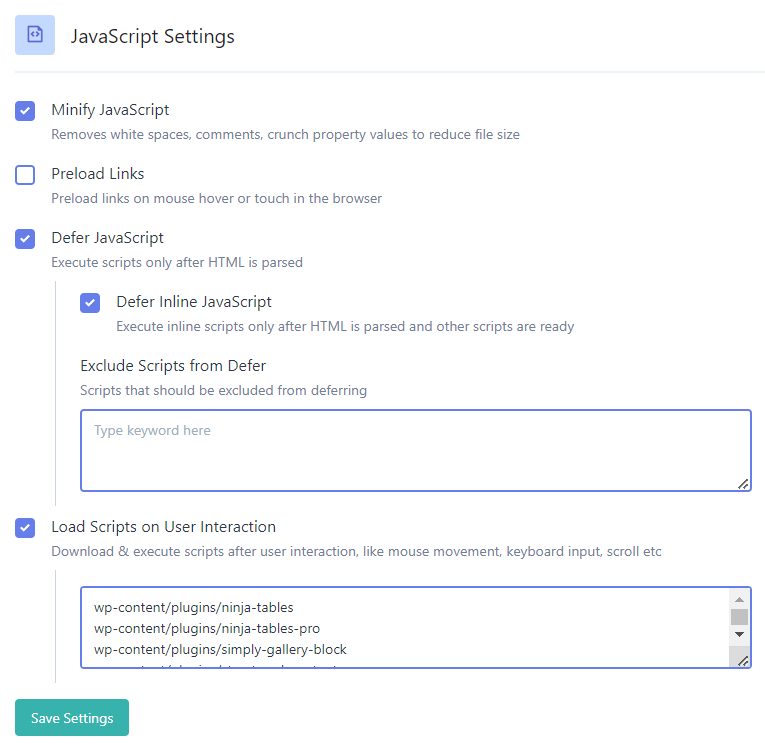
- Minify JavaScript: On – basically the same optimizations as minify CSS only for JS.
- Preload Links: Off – when users hover over a link, that page will be preloaded so by the time users actually click it, the page will appear to load almost instantly. This also means that if users hover over lots of links, too many pages can be preloaded which can increase CPU usage (especially on shared servers). To be safe, you should probably leave this off.
- Defer JavaScript: Off – can fix render-blocking errors by loading JS asynchronously, but Johnny suggests not enabling it since it improves scores at the cost of a slower website.
- Load Scripts on User Interaction – see list below of common JavaScript to delay. The documentation explains how to delay specific plugins (wp-content/plugins/xxx), scripts from a theme (wp-content/themes), etc. You can also check your “reduce impact of third-party code” report. If there’s no user interaction, all scripts load after a 10s timeout period. If you delay AdSense, make sure this doesn’t impact data + revenue.
ga( '
ga('
google-analytics.com/analytics.js
analytics.js
gtagv4.js
analytics-minimal.js
/gtm.js
/gtag/js
gtag(
/gtm-
adsbygoogle.js
grecaptcha.execute
optimize.js
fbevents.js
fbq(
/busting/facebook-tracking/
disqus.com/embed.js
script.hotjar.com
wp-content/themes/script-name
wp-content/plugins/plugin-name
5. Font
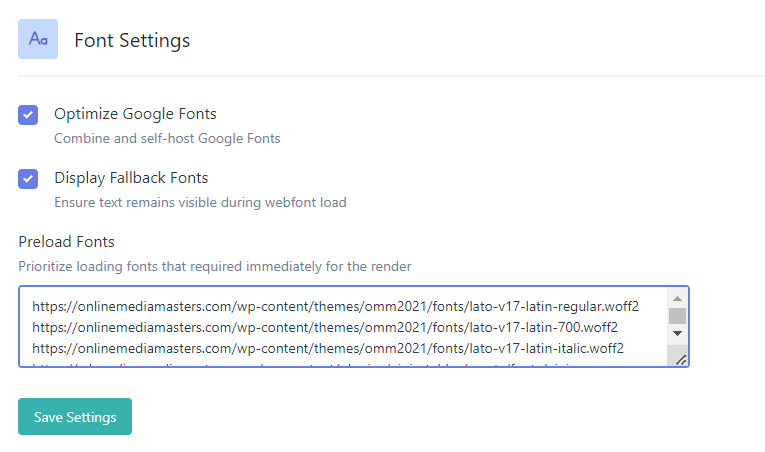
- Optimize Google Fonts: On – downloads Google fonts to host them locally, combines, and inlines them. Google Fonts served by external JavaScript files can’t be hosted locally.
- Display Fallback Fonts: On – addresses “ensure text remains visible during webfont load” in PageSpeed Insights which improves CLS. This will set a fallback font for external fonts and prevents FOIT (flash of invisible text) by adding font-display: swap to your CSS. But this can also cause FOUT (flash of unstyled text), so choose between one or the other.
- Preload Fonts: On – Gijo recommendsonly preloading fonts mentioned in the CSS file and fonts loading above-fold. PSI should tell you which fonts to preload under “preload key requests.” If you’re using a CDN URL to serve fonts, make sure you use the font file with the CDN URL in it (it should match the exact font file found in PageSpeed Insights).
6. Image
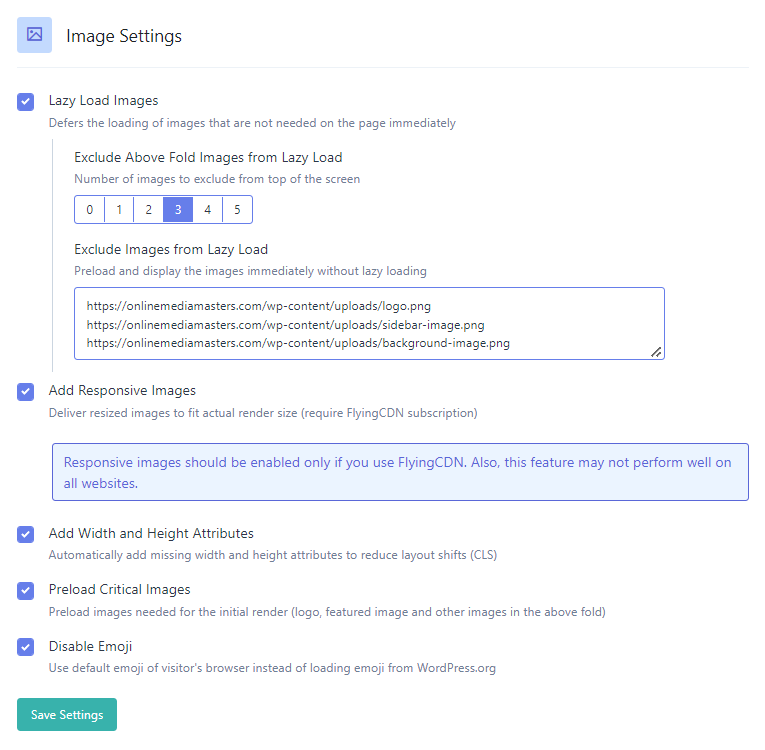
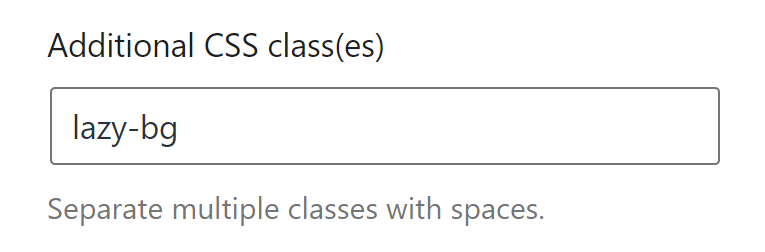
- Lazy Load Images: browser native in most cases which is supported by most major browsers (except Safari) and doesn’t use JavaScript. Otherwise, “using JavaScript” is supported by all major browsers (including Safari) but JavaScript has worse performance. I have “exclude above fold images from lazy load” set to 3since lazy loading images in the viewport increases LCP. But it depends on how many images are typically in the viewport. Gijo has instructions for lazy loading background images by using the CSS class “lazy-bg”.
- Add Responsive Images: On – can only used with a FlyingCDN subscription. This resizes images to the appropriate size based on render size. Similar to Cloudflare’s image resizing.
- Add Width And Height Attributes: On – improves CLS by adding width/height attributes to images. This should help fix the ‘use explicit weight and height’ recommendation in PSI.
- Preload Critical Images: On – FlyingPress will attempt to detect images shown in the viewport so these images can be preloaded and excluded from lazy load automatically.
- Disable Emoji: On – removes a small JavaScript code in WordPress that displays emojis.
7. IFrame
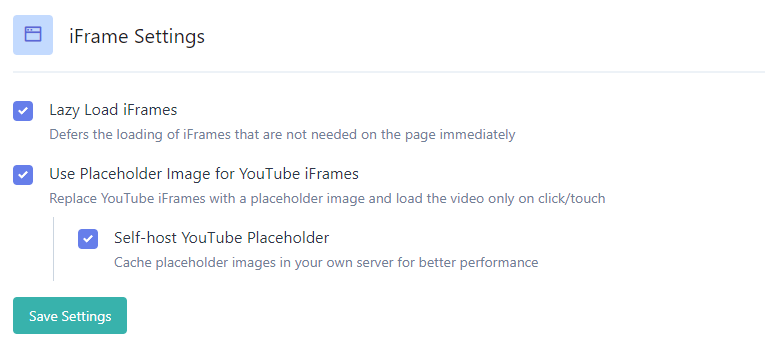
- Lazy Load iFrames: On – iFrames like embedded videos and Google Maps will only be loaded when they’re near the viewport, and will be excluded if they’re in the viewport.
- Use Placeholder Image for YouTube iFrames: On – replaces YouTube iFrames with a preview image. Significantly improves speed if you embed videos since they load extra JavaScript + third-party requests. The iFrame only loads when the play button is clicked.
- Self-host YouTube Placeholder: On – love this setting! Even when replacing iframes with preview images, you’ll see third-party requests from i.ytimg.com. This should eliminate them by hosting the placeholder on your server instead of pulling them from that external domain. It also means YouTube thumbnails can now be cached and served from your CDN.
8. CDN
FlyingCDN uses BunnyCDN with geo-replication and Bunny Optimizer for $0.03/GB.
Normally, BunnyCDN’s pricing is $0.01/GB – $0.06/GB depending on your regions, geo-replication costs $0.045/GB for all 5 replicated regions, and Bunny Optimizer (for image optimization) is $9.50/month. Paying a flat $0.03/GB is a solid deal Gijo worked out with them.
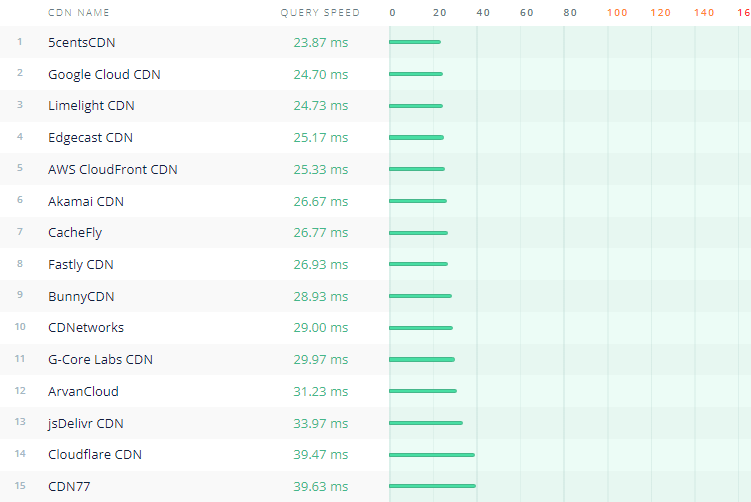
BunnyCDN (Used By FlyingCDN) – consistently performant CDN on cdnperf.com with 93 PoPs and 80 Tbps+. Compared to RocketCDN/StackPath, you get 23 more PoPs and it’s 15 Tbps faster.
Geo-replication – copies your files to BunnyCDN’s storage zones. Files are pulled from the closest zone and requests won’t hit the origin. Improves cache/hit ratio and reduces latency.
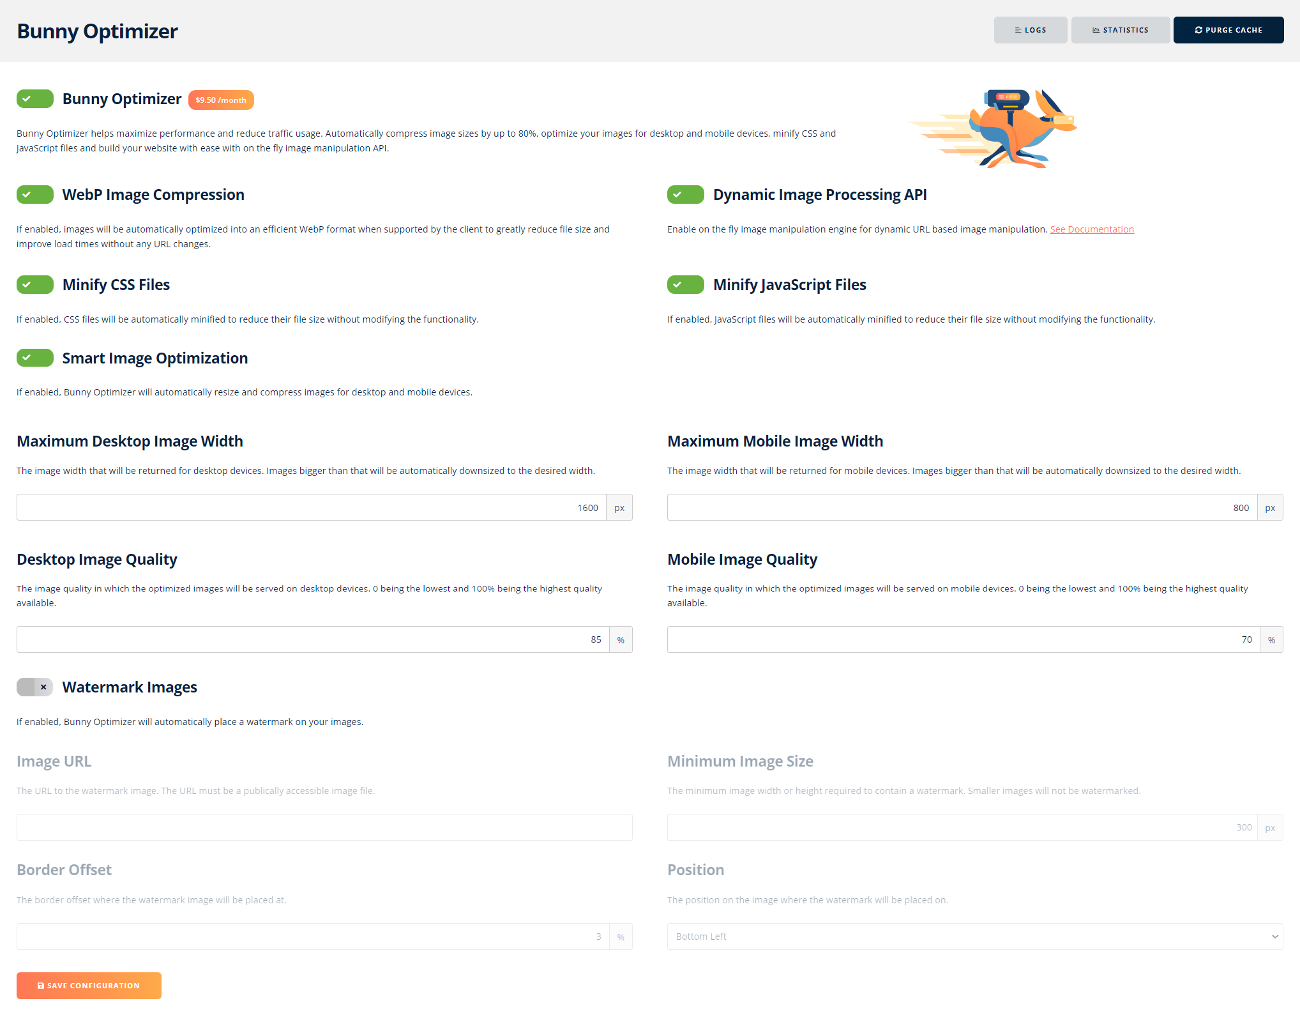
Bunny Optimizer – image optimization service offered by BunnyCDN which includes compression, WebP, and resizing images to serve smaller versions to mobile devices.
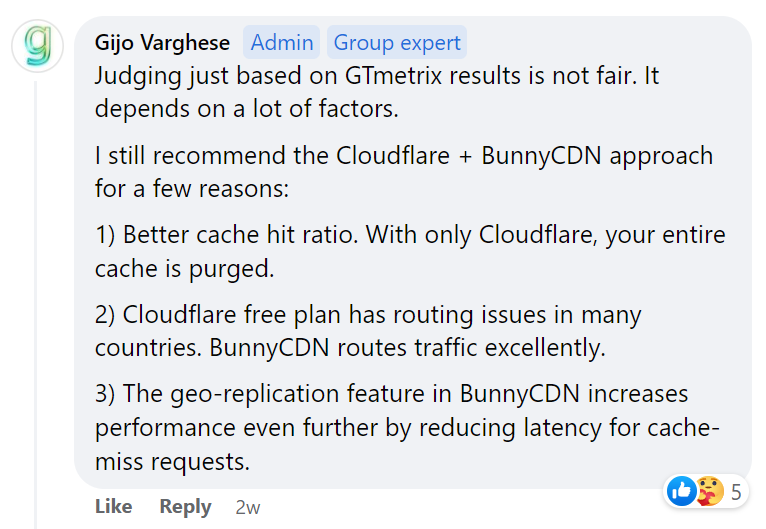
BunnyCDN + Cloudflare – Gijo recommends the BunnyCDN + Cloudflare combination for a better cache/hit ratio, traffic routing, and geo-replication. This is also what I use on my website.
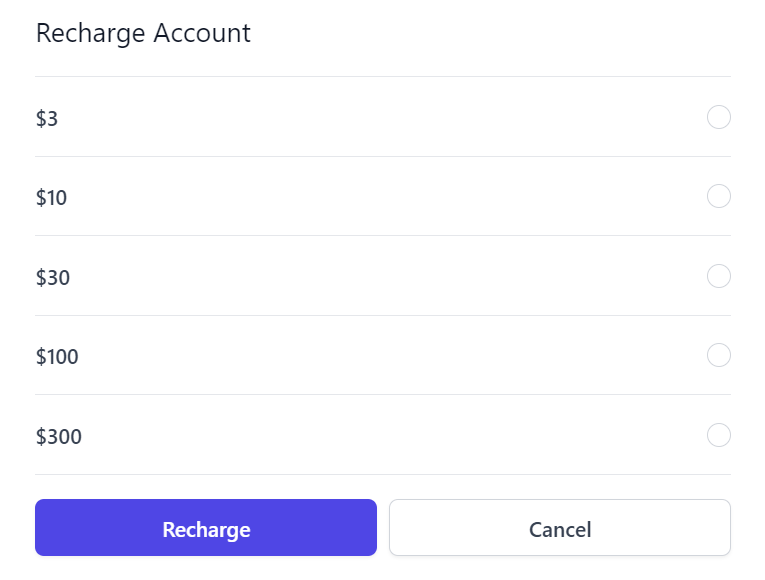
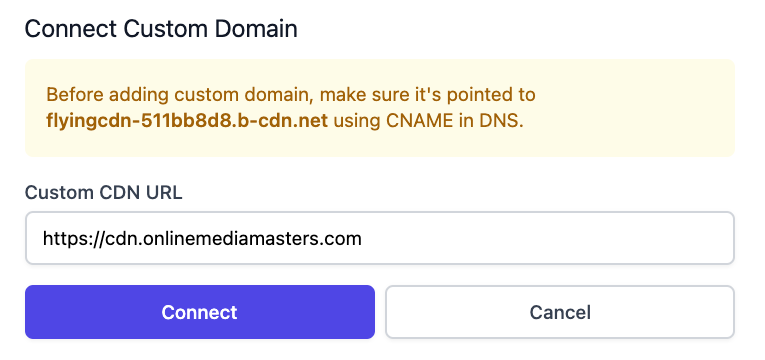
Gijo has instructions for setting up FlyingCDN or you can follow mine:
Step 1: Add money to your FlyingCDN account.
Step 2: Set up a custom CDN URL by adding a CNAME record to your DNS.
Step 3: Add your CDN URL to FlyingPress and select the types of files to serve (i.e. all files).
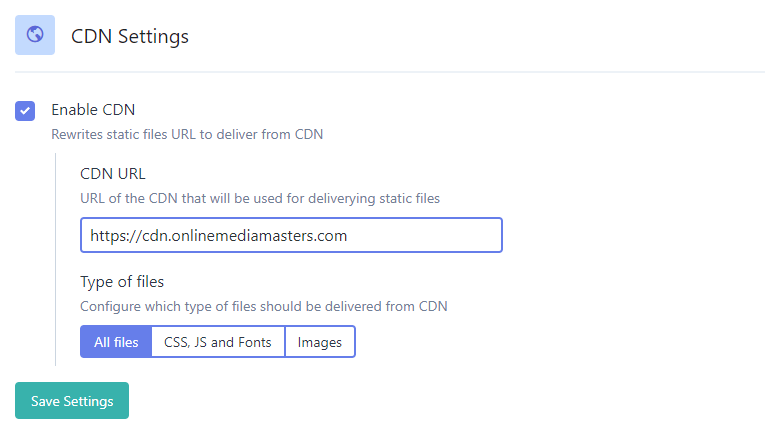
Step 4: View your source code and make sure the correct files (i.e. CSS/JS/fonts) are being served from FlyingCDN. You can also try purging or waiting some time for the files to update.

Recommended Cloudflare settings – if using Cloudflare, Gijo’s recommendschanging your website to proxied, setting browser cache TTL to 1 year (or respect existing headers if using Cloudflare to cache pages), only minifying CSS + JS (not HTML), and disabling Rocket Loader.
9. Database
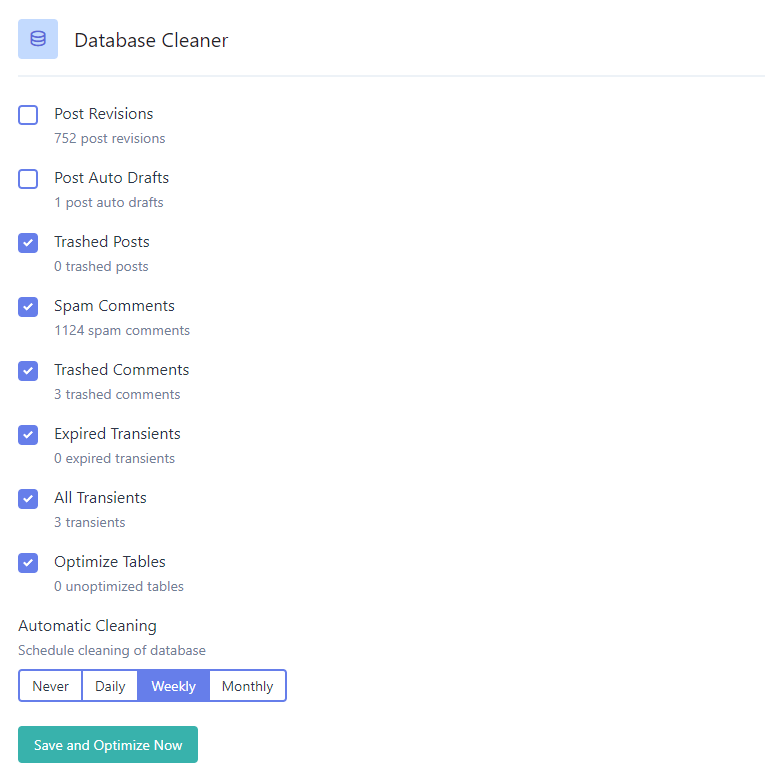
I have database cleanups scheduled weekly(I know, not a good idea, but I’m lazy).
I don’t delete auto drafts or post revisions because I want to keep at least a few backups of posts, but I do limit post revisions to only 5 using Perfmatters (or just do it with a line of code).
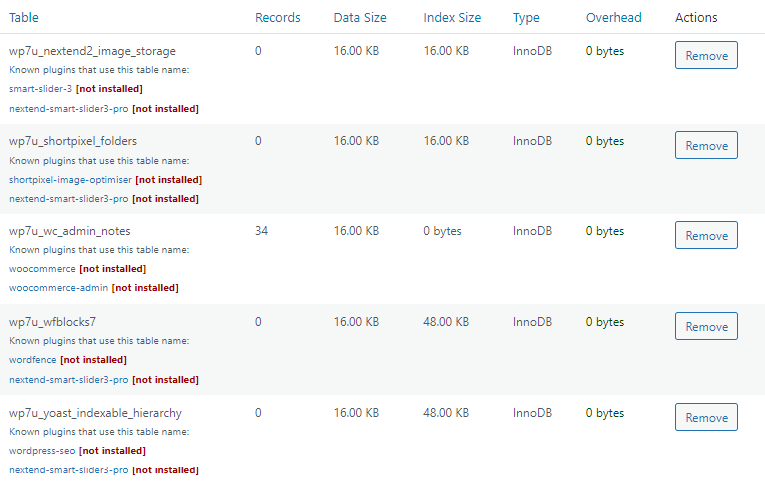
Just like I recommend with any cache plugin, I like to install WP-Optimize once in a blue moon to do a thorough cleaning of my database. If you install/delete plugins often, they leave behind bloat in your database. You can probably delete all tables that say “remove.” Also take note of plugin features/modules causing bloat (such as anything that scans your site or provides data).
10. Cloudflare APO
FlyingPress is fully compatible with Cloudflare APO. I wrote a detailed guide on setting up Cloudflare APO using the Cloudflare plugin, or Cloudflare also has their own APO instructions.
The first step is to benchmark your results/TTFB in KeyCDN and disable FlyingPress (this is recommended by Cloudflare). You’ll reactivate FlyingPress after you confirm APO is working. Kinsta’s Brian Li recommends keeping caching enabled in your cache plugin when using APO.
Next, you’ll need to proxy your traffic through Cloudflare in order to use APO. Just turn your website to proxied (not DNS only) in Cloudflare’s DNS settings. Once you’ve purchased APO ($5/mo), install Cloudflare’s plugin, create an API Token in Cloudflare, and add it to the plugin.
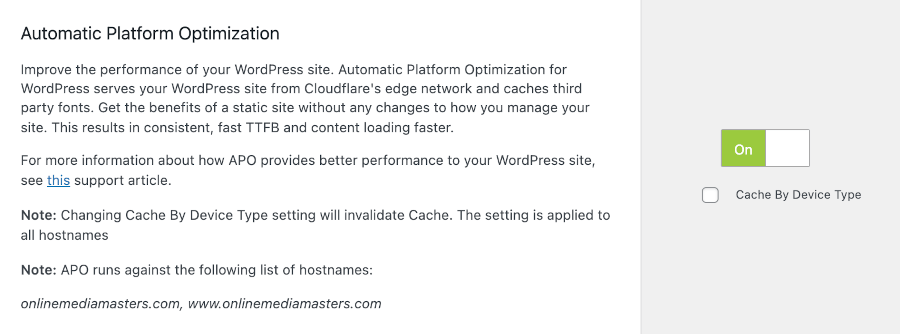
Finally, use uptrends.com to make sure APO is working by testing your website using https://www. format. Reference the screenshot below. Once it works, reactivate FlyingPress. Gijo also listed some recommended Cloudflare settings if you’re caching pages with Cloudflare.
Cloudflare’s plugin has a setting to “apply recommended Cloudflare settings for WordPress,” but I would only do this if you’re not comfortable with configuring your Cloudflare settings.
11. FlyingPress vs. WP Rocket vs. SG Optimizer
WP Rocket needs to do a better job of optimizing for real-world browsing. Remove unused CSS uses the slower inline method, lazy loading background images is harder, and RocketCDN isn’t great. SiteGround Optimizer is clearly missing features and isn’t reliable. Perfmatters can help take care of some optimizations they lack, but at that point you’re better just using FlyingPress.
Conclusion
You don’t know until you know: flying-press.com
For more such interesting article like this, app/softwares, games, Gadget Reviews, comparisons, troubleshooting guides, listicles, and tips & tricks related to Windows, Android, iOS, and macOS, follow us on Google News, Facebook, Instagram, Twitter, YouTube, and Pinterest.


